


You've got the bag on the counter, the mold is ready, and the plan is simple in your head. Then you melt the cocoa butter wafers, pour them, cool them, and the finished piece comes out dull, streaky, or soft when you expected a clean snap. That's the point where most makers realize cocoa butter wafers are not a shortcut around technique, they're a cleaner way to work with a fat that has very specific rules.
Cocoa butter wafers are easy to use, but they still behave like cocoa butter, because that's exactly what they are. If you learn how this fat melts, sets, and shifts between crystal forms, you can make better bars, cleaner coatings, smoother ganache, and more stable edibles without guessing. The good news is that the same few principles explain most of the problems people run into, from bloom to graininess to a batch that never quite firms up.
Why Cocoa Butter Wafers Matter for Makers and Edible Creators
A small-batch maker opens a one-pound bag, sees neat little wafers, and thinks, “Can I just melt these like chocolate chips and pour?” That instinct is understandable, but it misses the main point. Cocoa butter wafers are pure cocoa butter in portion form, so what you do next depends on how you manage the fat phase, not on some magic convenience built into the wafer shape.
That matters because cocoa butter is the ingredient that made modern molded chocolate possible. In the 19th century, 1828 brought Coenraad van Houten's cocoa press, which separated cocoa butter from cocoa solids and made cocoa powder more workable, 1847 brought Fry and Sons' sweet eating chocolate, and 1876 brought Daniel Peter's milk chocolate formula that helped shape major global chocolate markets today, according to the American Natural and Historical Press chocolate history timeline. Those milestones are why a fat like cocoa butter can be turned into bars, wafers, filled pieces, and coatings instead of staying a messy, unshaped mass.
The simple way to think about the ingredient
A wafer is just a measured, easy-melt form of that fat. It is not finished chocolate, and it does not contain sugar, milk, or flavor unless a maker adds them. That distinction sounds basic, but it's where beginners get tripped up, especially when they expect wafer form to equal ready-to-use chocolate.
Practical rule: If the recipe depends on sweetness, dairy, or structure from chocolate solids, cocoa butter wafers are only one piece of the formula.
That is why this ingredient shows up in so many projects. It can be the base for homemade white chocolate, a smooth enrobing fat, a texture aid in ganache, or a neutral carrier for flavored infusions. Once you understand that the wafer is the ingredient, not the finished result, the rest of the craft starts to make sense.
What Cocoa Butter Wafers Actually Are
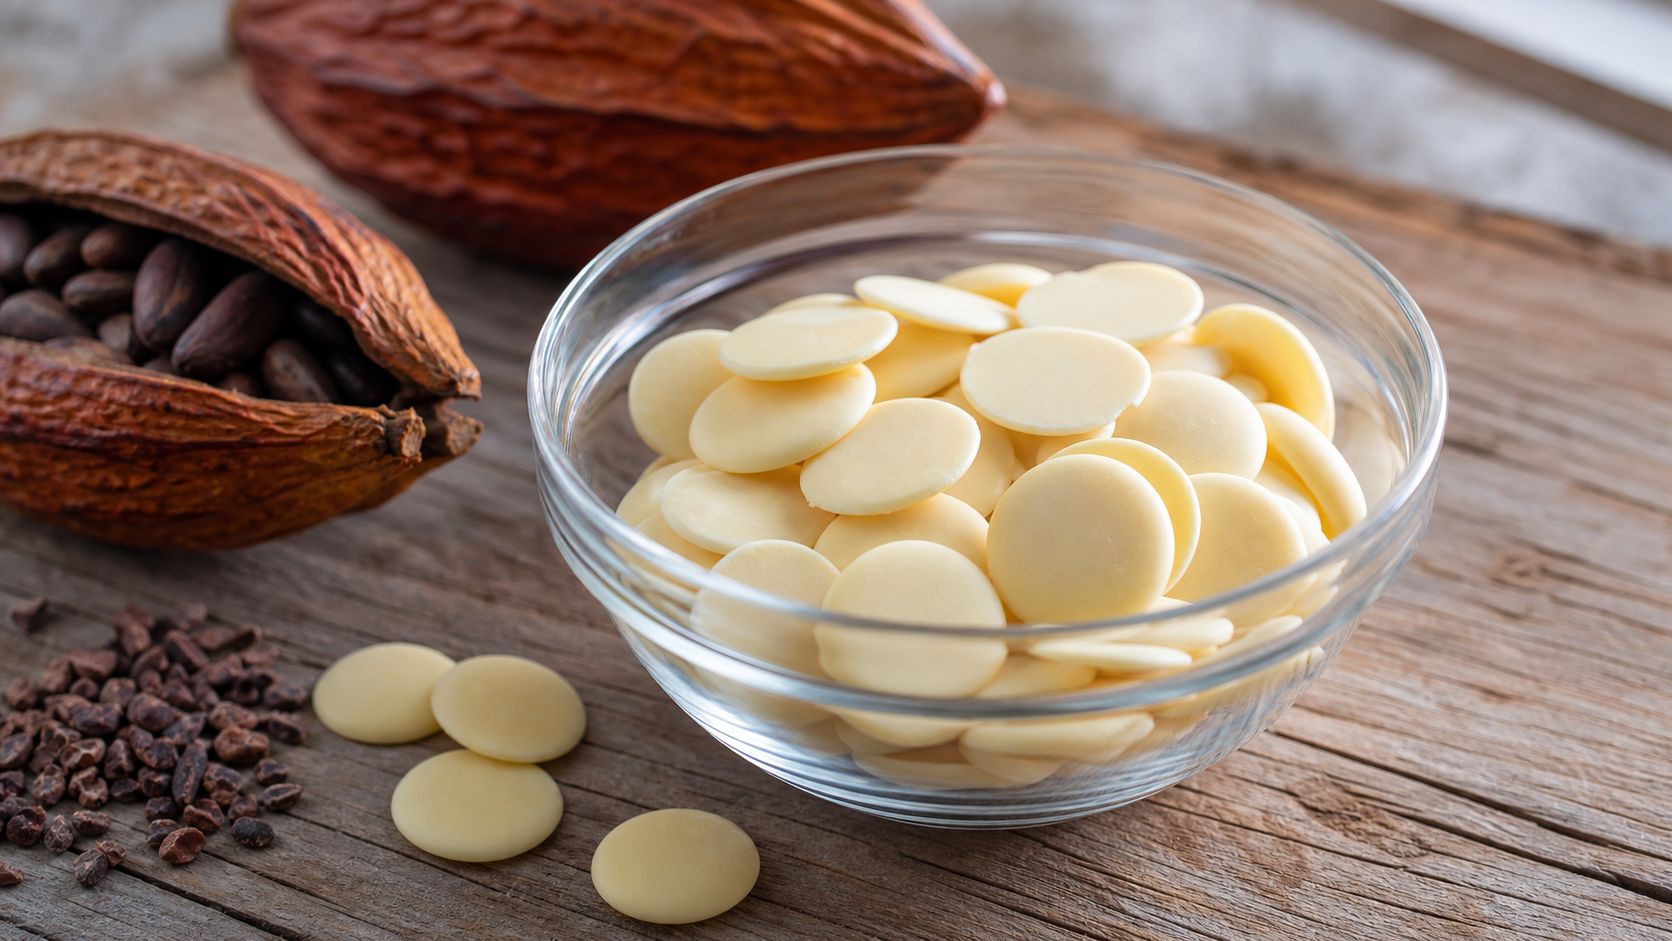
Cocoa butter wafers are portioned pieces of refined cocoa butter, usually formed into discs or pellets so they melt faster and more evenly than a hard block. Think of them as a maker-friendly format, not a different ingredient. The advantage is practical, a bag of wafers is easier to weigh, scoop, and melt in controlled amounts than a large slab.
The raw material still comes from cacao, and the final processing choice changes how it smells and behaves in your kitchen. A natural cocoa butter option may carry more aroma, while a deodorized cocoa butter option is stripped down for neutral flavor and broader use. That difference matters when you want the cocoa note to stay quiet, especially in white chocolate formulas, floral infusions, or cosmetic-style applications.
Wafer versus block versus finished chocolate
A block of cocoa butter and a bag of wafers are the same fat in two different shapes. The block gives you bulk, the wafers give you convenience. Finished chocolate is different, because it already combines cocoa butter with cocoa solids, sugar, and often milk ingredients, so it behaves like a complete food rather than a building material.
That is why many makers keep wafers in the ingredient drawer instead of the candy cabinet. They want control. They want to decide how much sweetness goes in, whether the final formula is dairy-free, and how much flavor the cocoa fat should contribute.
A wafer is the ingredient you build with, not the candy you serve.
That also explains why deodorized wafers are popular in non-candy uses. If you are working with botanicals, spice extracts, or skin-focused formulations, a neutral fat gives you more room to shape the final aroma. In edible work, the same neutrality can help a vanilla-forward or fruit-forward recipe stay clean instead of muddy.
Melting Point, Mouthfeel, and Why Bloom Happens
Cocoa butter wafers feel so usable because their melting range sits close to body temperature. Commercial specifications commonly place that window around 30 to 38°C, with one organic wafer certificate of analysis listing 32.6°C and another supplier listing 30 to 36°C in the provided brief, which is why the ingredient stays solid on the shelf but melts fast on the tongue. A maker feels that as coolness, then a quick release, then no waxy drag.
That is also why a warm room can be enough to make chocolate look off even when nothing “went wrong” in the recipe. Cocoa butter doesn't just melt, it crystallizes in multiple forms, a property called polymorphism. Some crystal forms are stable and glossy, some are weak and unstable, and the way the fat cools decides which one you end up with.
What bloom is really telling you
Fat bloom is the whitish haze that can show up when cocoa butter crystals rearrange or migrate. Sugar bloom looks more grainy or damp, and it usually follows moisture exposure. Makers often blame the ingredient, but bloom is usually a storage or tempering issue, not proof that the cocoa butter itself is bad.
The easiest mental model is this. If the fat cooled in a messy way, the crystals can set unevenly. If the finished piece then sits in a room that is too warm, the stable structure can slowly break down or shift at the surface. That's how a glossy shell turns gray.
Useful shortcut: Temperature history matters more than optimism. If you heat and cool cocoa butter carelessly, bloom becomes much more likely later.
This is why the same ingredient can make a stunning bar in one kitchen and a dull one in another. The ingredient didn't change. The crystal pattern did.
Culinary Uses for Chocolates, Ganache, and Edibles
A maker building white chocolate from scratch often starts with cocoa butter wafers because the fat is already clean, measured, and ready to combine with sugar and milk powder. The wafers give the recipe structure, while the dry ingredients supply sweetness and dairy notes. That is how you get a true chocolate-style base rather than a flavored fat bomb.
For enrobing, the value is speed and consistency. Melt the wafers properly, add your flavor or color if needed, and you have a coating that can cling to fruit, cookies, truffles, or molded fillings. A smooth cocoa butter coating also works well when you need a neat finish on a project that should look polished rather than rustic.
Where the ingredient shines in a maker's kitchen
Ganache is another place where people misunderstand the role of cocoa butter. When the fat phase is balanced correctly, the result can set cleanly instead of weeping or turning greasy. The wafers help with body and mouthfeel, especially when the maker wants a stable set without adding more dairy than the formula needs.
For infused edibles, the same ingredient becomes a neutral carrier. Herbs, spices, and botanical extracts can ride in the fat without fighting strong sweetness. That is useful when the goal is a crafted chocolate bar or a specialty edible where the flavor profile needs to stay controlled.
A hot drink or shake can also benefit from the way cocoa butter melts. Because it softens near body temperature, it can blend smoothly when added to a warm base, provided the maker manages the fat load and stirs with intention. The issue is not whether it melts, it's whether the surrounding liquid can hold the fat evenly.
This edible-focused chocolate bar guide is a useful reminder that chocolate-style formats are all about getting the matrix right, not just mixing sweet ingredients together. The format matters because structure changes how the final piece feels, stores, and slices.
Melting and Tempering the Right Way
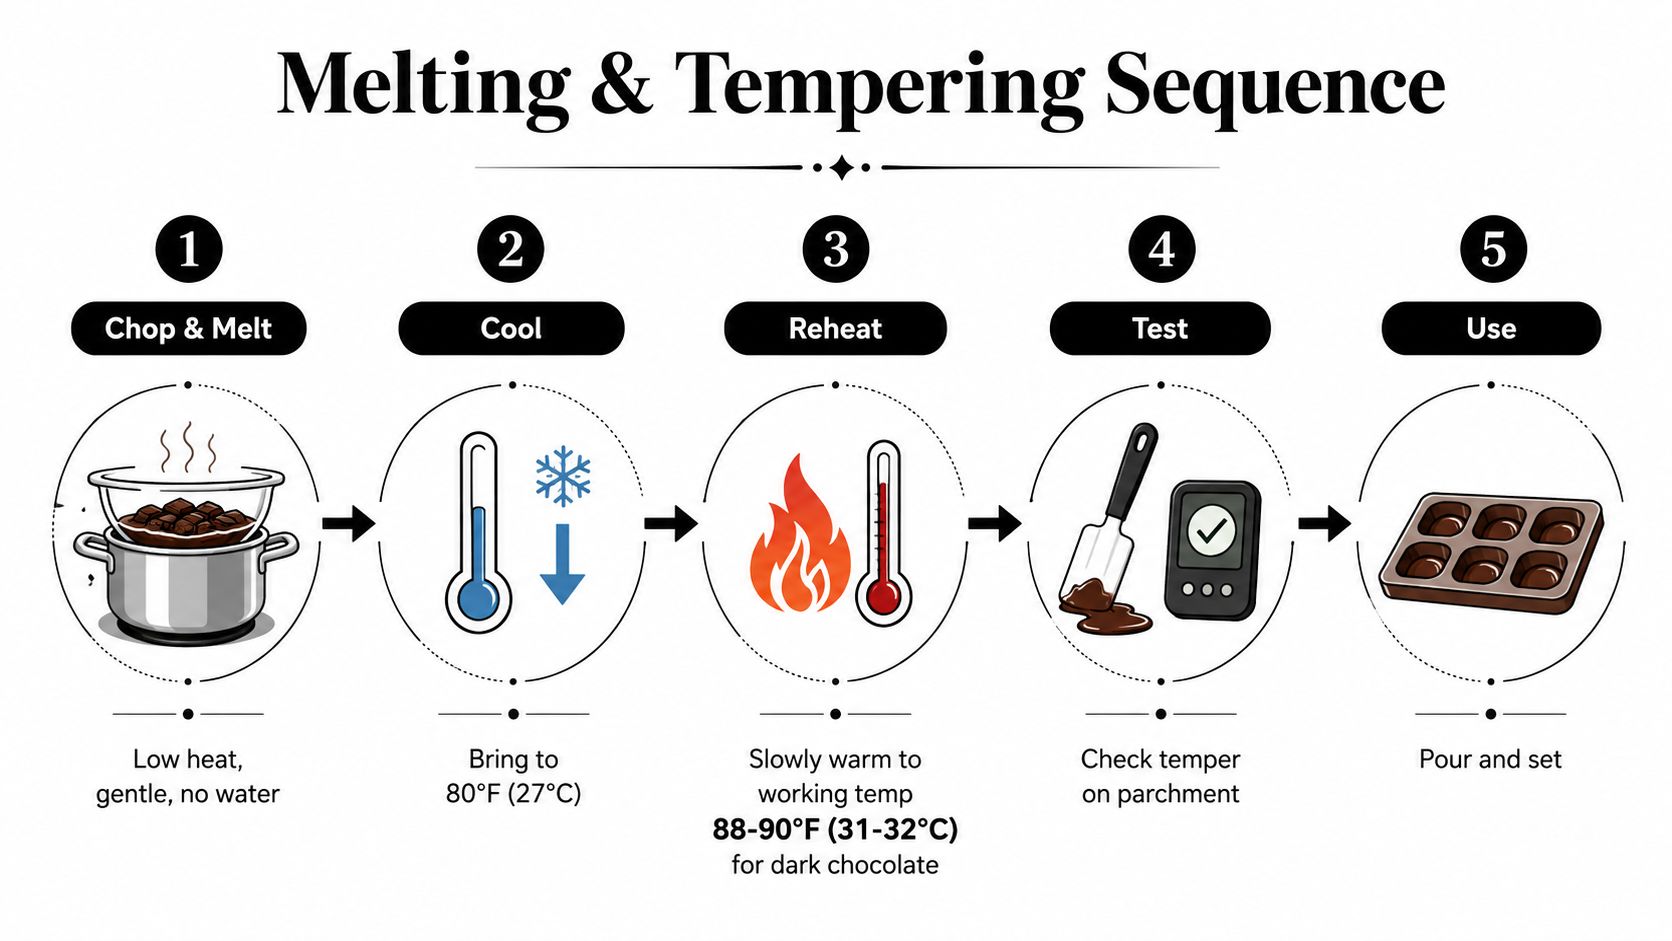
Start with gentle heat. A bain-marie works well because the bowl never sits directly on a hot surface, and a low-power microwave can also work if you stop often and stir. Water is the enemy here, not because cocoa butter fears steam philosophically, but because stray moisture can create texture trouble and make the batch harder to control.
Once the wafers are fully melted, don't rush straight to the mold. Cool the mass a bit, then seed it with stable crystals, often by adding a small amount of chopped tempered chocolate or another known seed source. That gives the cocoa butter a structure to copy instead of guessing its way into random crystal forms.
How to know you're in the working zone
For dark chocolate work, a practical target mentioned in the brief is a reheat to 88 to 90°F, or 31 to 32°C, after cooling. The infographic target also points to a cool-down around 80°F, or 27°C, before the final reheat. Those numbers matter because they nudge the fat toward a more stable crystal set without leaving it too hot to hold its structure.
Watch the texture as much as the thermometer. Properly tempered cocoa butter looks smooth, flows cleanly, and starts to thicken slightly as it nears working temperature. If it's overheated, you can usually rescue it by cooling a bit more and reseeding rather than panicking and starting from zero.
If you want a glossy shell, treat tempering like crystal management, not like a ritual.
Substitutions and Formulation Alternatives
Not every recipe needs cocoa butter wafers, and not every maker wants to pay for them when a cheaper fat will do. The right substitute depends on what you care about most. If you want gloss, snap, and a true chocolate-style melt, cocoa butter still sets the standard.
The closest swap is a cocoa butter block, which is the same ingredient in a different format. It behaves nearly the same in the pan and in the mold, but it can be slower to portion and melt because you have to cut it down first. For makers who already understand the fat, it's a packaging choice more than a formulation choice.
Common substitutes for cocoa butter wafers compared
| Substitute | Best For | Watch Out For |
|---|---|---|
| Cocoa butter block | Large batches, simple ingredient continuity | Slower to portion and melt |
| Cocoa butter equivalent | Some industrial-style chocolate applications | It may not crystallize with cocoa butter the same way |
| Coconut oil | Soft fillings, simple home recipes | It softens easily in a warm room |
| Palm-based shortening | Certain low-cost formulations | It can change flavor, texture, and sourcing comfort |
Cocoa butter equivalents, or CBEs, can work in some chocolate-type systems, but they are not a universal swap. The crystal behavior may not line up with cocoa butter the way a beginner expects, which can change snap and finish. Coconut oil is easy to use, but it softens quickly compared with cocoa butter, so it's a different tool for a different outcome.
If you're working through fat substitution for gummies or other infused formats, this coconut-oil gummy formulation guide is a useful contrast because it shows how another fat behaves in a very different product. The bigger lesson is simple. Choose the substitute for the product you want, not just for the ingredient you already have.
Storage, Shelf Life, and Sourcing Considerations
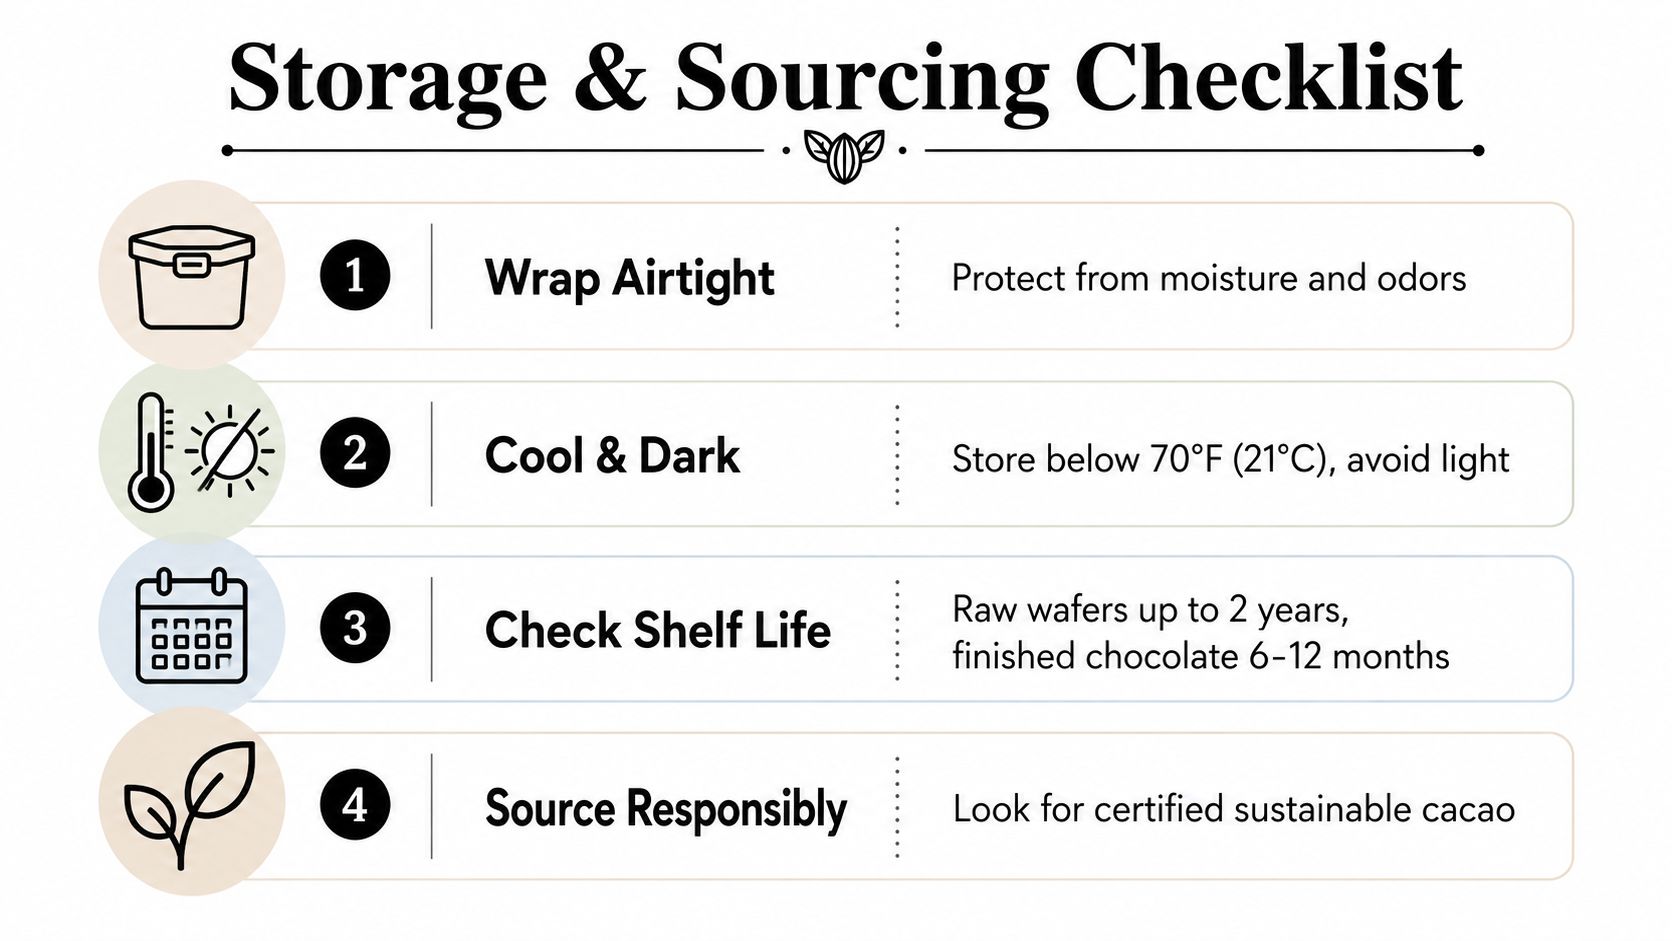
Raw cocoa butter wafers should be wrapped airtight and kept away from moisture and odors. The fat picks up surrounding smells more easily than many beginners expect, so storing it next to garlic powder, coffee, or a scented pantry item is asking for trouble. A cool, dark cabinet is better than a sunny counter, and a stable environment is better than moving the bag from hot to cold all the time.
The checklist for finished products is similar, but more exacting. Store them cool and dry, because light and heat can damage the finish even if the bar is still safe to eat. The provided visual brief suggests keeping storage below 70°F, or 21°C, which is a practical benchmark for protecting surface quality.
What to ask before you buy
The label terms can be helpful, but they are not magic. Deodorized changes aroma more than fat profile. Organic speaks to growing and processing standards. Fair trade tells you something about sourcing ethics, but not about how the wafers will crystallize in your kitchen.
The source notes also point to a broader issue, cocoa butter itself is generally not the main allergen concern, but facility cross-contact can be. That's why a supplier conversation should include documentation, not just a pretty product page. Ask for a certificate of analysis, a note on fat profile, and clarity on minimum order size before you commit.
This edible pricing reference is useful if you're comparing how ingredient choice affects your own product planning, especially when you're thinking beyond hobby batches. Sourcing well protects both texture and margin, and both matter when you're making at scale.
Putting It All Together for Better Edibles
Cocoa butter wafers are predictable, but they're not forgiving of sloppy handling. The finish you get comes from temperature control, crystal control, and ingredient choice, not from the wafer shape itself. If a bar blooms, that usually points to heat history or moisture, not a mysterious flaw in the cocoa butter.
The biggest win for makers is confidence. Once you understand that tempering is a learnable craft and substitution is a deliberate decision, you stop treating every failed batch like a surprise. You start reading the fat the same way a chocolatier does, by watching how it melts, how it sets, and how it behaves after cooling.
If you want edible products that are built with the same attention to structure and finish described here, Metro Mush offers curated chocolate bars, drinks, and other crafted formats that show how much the final experience depends on the base. Visit Metro Mush to explore what they make and see how thoughtful formulation turns a simple ingredient into a better finished product.