



You're probably in one of two places right now. You're either curious enough to grow Golden Teachers yourself, or you've looked at the process and realized it's more technical, slower, and legally riskier than people make it sound online.
Both reactions are reasonable.
Golden Teacher has a reputation for being approachable, which is why it comes up so often in beginner conversations. But “beginner-friendly” doesn't mean forgiving of sloppy technique. Clean work, stable conditions, and patience matter more than strain hype. If you want to learn how to grow Golden Teachers, the process can be highly satisfying. If you don't want to deal with sterile workflow, contamination losses, storage, and legal gray areas, buying from a vetted local source is also a valid decision.
The Golden Teacher Journey Begins
Golden Teacher sits in a strange spot in mushroom culture. It's familiar, widely discussed, and often treated as a reference point for Psilocybe cubensis. That familiarity leads a lot of new growers to assume the outcome is predictable. It isn't.
Recent data discussed on the Psilocybe cubensis overview notes that psilocybin content across submitted mushroom samples ranged from 0.14% to 2.26% dry weight, and Golden Teacher was described as having potency similar to most other varieties in that preliminary dataset. The practical takeaway is simple. A strain name doesn't lock in potency. Genetics, cultivation conditions, and post-harvest handling all matter.
Why people choose to grow
Growing appeals to people who want direct control. You choose the substrate, manage the fruiting environment, watch colonization happen, and learn what healthy mycelium looks like. That hands-on process teaches respect for sterility fast. It also shows how much of cultivation is environmental management, not magic.
If you're still getting oriented, Metro Mush has a useful strain overview in its guide to Psilocybe cubensis varieties, which includes Golden Teacher in the broader context of commonly discussed cubensis names.
Healthy cultivation starts with dropping the idea that a named strain guarantees a fixed result.
The legal and practical fork in the road
It's important to be upfront: Cultivating psilocybin mushrooms can carry legal risk depending on where you live, and that risk doesn't disappear because a grow is small or personal. On top of that, the practical side is real. Contamination can wipe out a project. Poor drying can ruin a harvest. A rushed grower often wastes time and material.
For adults in Southeast Michigan, especially around Ann Arbor and Detroit where local policy conversations have shifted over time, there are really two paths. One is the DIY route. It's educational, detail-heavy, and rewarding if you enjoy process. The other is skipping cultivation entirely and purchasing quality-controlled products from a trusted local source. For many people, that's the safer and more realistic choice.
What success actually looks like
A successful first grow usually looks boring. The room is clean. The workflow is deliberate. Nothing dramatic happens for a while. Then the mycelium takes hold, fruiting conditions are introduced carefully, and the grower avoids the most common beginner mistake, which is doing too much.
That same mindset applies if you decide not to grow. A calm, informed decision is better than forcing a hobby you don't want. Either way, the smart move is to understand the process before you touch spores, substrate, or storage jars.
Gathering Your Cultivation Toolkit
Before you inoculate anything, build your setup. Most failures start long before spores enter the picture. A rushed shopping list leads to improvised sterile technique, and improvised sterile technique usually turns into contamination.
The non-negotiable gear
You don't need a lab. You do need basic discipline and the right tools.
Spore syringe
This is your inoculant. Handle it like a sterile instrument, not like a casual gardening supply.Substrate or grain containers
Jars, grain bags, or all-in-one bags all work if they're prepared cleanly and sealed properly.Still air box
This matters more than people think. A still air box reduces moving air during inoculation, which lowers the chance that airborne contaminants land where they shouldn't.Isopropyl alcohol
Use it to wipe surfaces, gloves, and the outside of containers before sterile work begins.Gloves and face mask
Your hands and breath are contamination vectors. Cover both.Micropore tape
Useful for breathable coverage on inoculation points or modified lids, depending on your setup.Lighter or torch
Needed for flame sterilizing the syringe needle.Paper towels and clean wipes
Keep the workspace orderly. Clutter creates mistakes.Pressure cooker
If you're preparing substrate or grain yourself, this is one of the most important pieces of equipment in the room.
What's convenient and what actually works
Beginners often try to save time by mixing methods. They buy a syringe, skip the sterile workflow, and assume a clean-looking kitchen is “good enough.” It usually isn't. Household spaces are full of floating mold spores and bacteria you can't see.
A more reliable beginner path is to simplify variables. If you don't want to prepare grain from scratch, pre-made options can reduce one failure point. For example, some growers start with magic mushroom grow bags because they combine substrate convenience with a contained workflow. That doesn't remove the need for sterile inoculation, but it does reduce prep complexity.
Practical rule: Buy less gear if you want, but don't cut sterility supplies. That's the wrong place to economize.
A clean workflow checklist
Run this like a pre-flight routine before inoculation day:
Clear the room
Remove loose clutter, open trash, and anything dusty.Wipe the work surface
Clean first. Then clean again.Set up the still air box
Place every tool inside before starting so you're not reaching in and out constantly.Lay tools in order of use
Syringe, lighter, alcohol, tape, substrate. Simple sequence reduces fumbling.Slow down
Fast hands cause bad needle control, poor seals, and accidental exposure.
The mindset that saves grows
Think of your toolkit as contamination control first and cultivation gear second. Beginners often focus on what grows mushrooms. Experienced growers focus on what keeps everything else from growing first.
That sounds strict because it is. Golden Teachers aren't difficult in theory. They're difficult in the same way baking is difficult when the kitchen is dirty and the measurements are sloppy.
Preparing Substrate and Inoculating Spores
This is the stage where patience pays for itself later. If your substrate is poorly prepared or your inoculation is careless, the rest of the grow becomes damage control.
Start with clean substrate
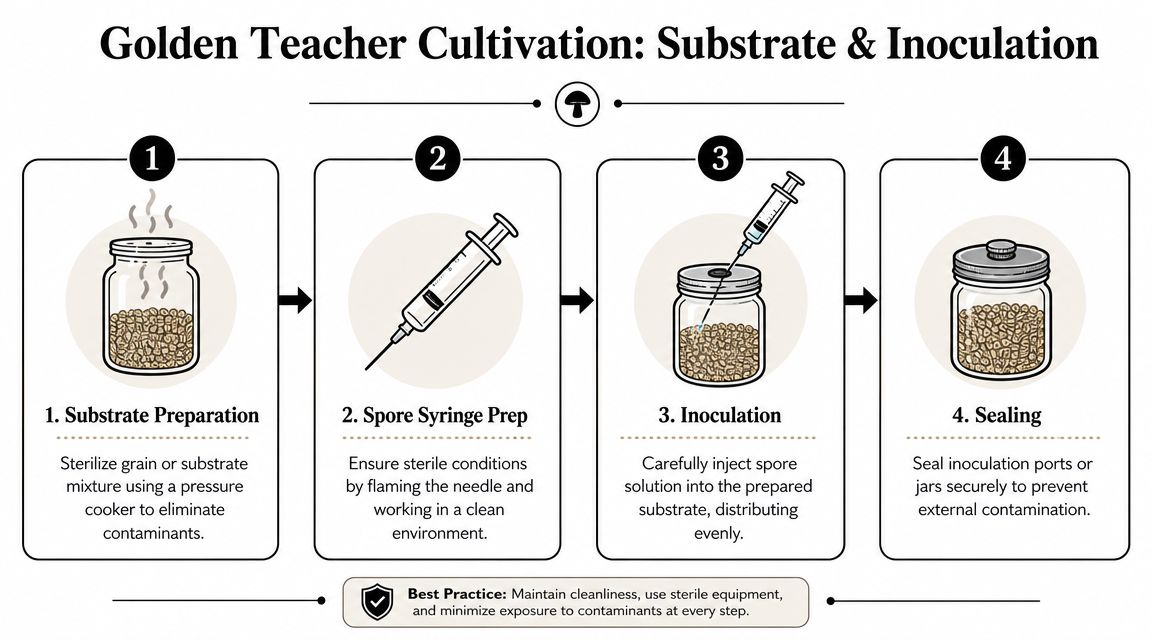
Substrate is the food source and home base for the mycelium. Whatever recipe you choose, the standard logic stays the same. It must be properly hydrated, loaded into a suitable container, and sterilized before inoculation.
If you prepare grain or substrate yourself, sterilization in a pressure cooker is the step that separates a viable grow from a mold nursery. The point isn't perfection for its own sake. The point is to give mushroom mycelium a clean head start instead of forcing it to compete from day one.
Some growers use jars. Others use spawn bags. Both can work if they're sealed, handled carefully, and allowed to cool fully before spores are introduced. Never inject into hot substrate. Heat can ruin the inoculant and create condensation problems you don't want.
Build a calm inoculation routine
Inoculation should feel almost mechanical. No rushing. No multitasking. No reaching across the room for something you forgot.
Use this order:
Sanitize the workspace and your gloves
Wipe surfaces and container exteriors before they enter the still air box.Place everything inside the still air box
Once you begin, keep movement minimal.Flame sterilize the needle
Do it carefully, then let it cool briefly before injection.Inject the spore solution into the substrate
Use a steady hand and avoid unnecessary handling.Seal the injection point if your setup requires it
Keep the container protected from outside exposure.
Mistakes that cause trouble early
A beginner usually loses a grow for one of a few reasons:
Touching sterile parts
If your fingers touch the needle or injection point, treat that as a problem.Working in moving air
Fans, vents, and drafts make contamination more likely.Overhandling the bag or jar
Every extra movement is another opportunity to introduce something unwanted.Skipping sterilization because the materials “look clean”
Clean-looking isn't sterile.
If you're nervous, that's useful. Careless growers contaminate more than anxious ones.
How to think like a cultivator
The right mindset here is simple. Assume contamination is always waiting for an opening. That assumption makes your process better. It pushes you to move slower, prepare better, and stop improvising.
Golden Teacher doesn't require fancy theatrics. It requires consistency. A clean syringe, sterile substrate, and deliberate inoculation beat a cluttered “advanced” setup every time.
If you get through this stage cleanly, you've done the hard part. The rest of the grow still matters, but successful inoculation gives you a real chance.
The Quiet Work of Incubation
After inoculation, the best growers become patient observers. Incubation isn't exciting, but it's where your project either establishes itself or reveals hidden problems.
What healthy growth looks like
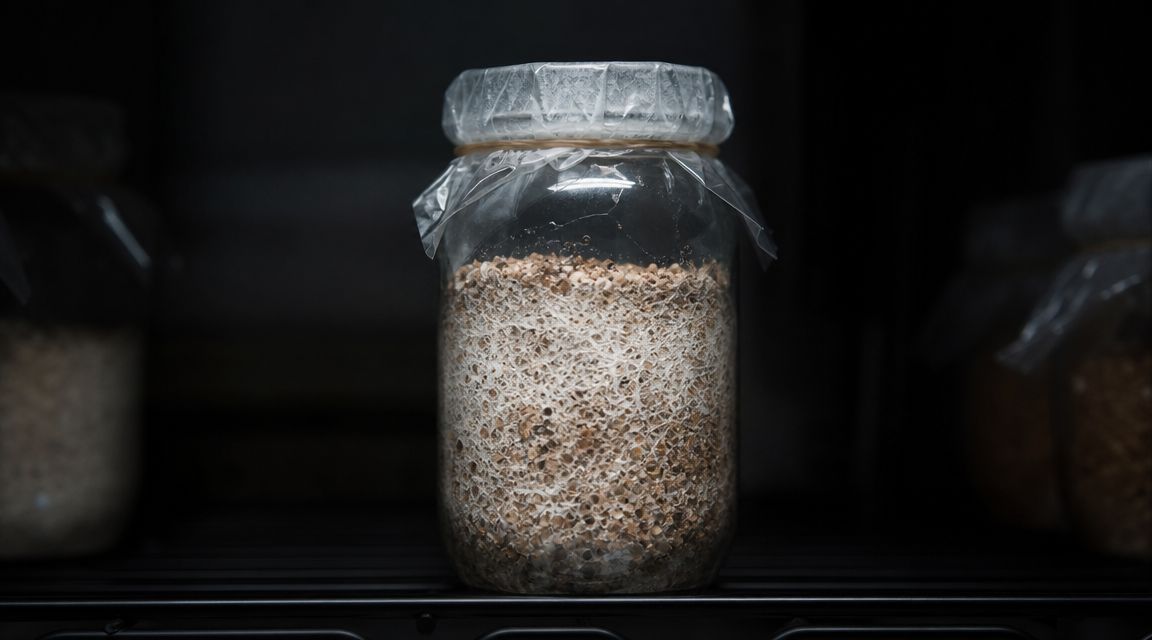
Healthy mycelium is typically bright white and spreads in a way that looks either threadlike or softly clouded. New growers often describe the best-looking growth as white roots, cotton, or a web of fine strands. The exact texture can vary, but the key signal is consistency. Healthy colonization expands with confidence instead of appearing in odd, discolored patches.
Leave the container alone as much as possible. Constant checking, shaking, opening, or repositioning doesn't help. Incubation rewards restraint.
What trouble looks like
Contamination rarely announces itself politely. It usually shows up as unusual color, strange texture, or growth that doesn't look like strong white mycelium.
Watch for signs like these:
Green patches
Green growth is a classic reason to isolate and discard.Gray, wispy overgrowth
If it looks weak, thin, and unlike healthy white colonization, treat it with suspicion.Wet, sour, or foul-looking areas
Healthy mycelium shouldn't look rotten.Unusual smell from a compromised container
If something smells wrong, don't talk yourself into optimism.
When contamination appears, don't “wait and see” for too long. Isolate first, inspect second.
The hardest skill is doing less
Incubation teaches one lesson faster than any other stage. Interference isn't the same as care. A colonizing substrate wants stable conditions and time. It doesn't need constant correction from an impatient beginner.
If the growth is healthy, keep your hands off it. If it's contaminated, be decisive and remove the problem. The middle ground is where many beginners waste the most time.
A good incubating container looks boring for stretches of time. That's normal. The mycelium is doing the quiet work for you.
Initiating Fruiting and Harvesting Your Crop
You open the tub one morning and the surface has changed. Instead of plain white mycelium, you see tiny knots and the first pins forming. This stage feels fast because small mistakes show up quickly. Dry air stalls growth. Heavy misting bruises the surface. Poor air exchange leads to long, thin fruits.
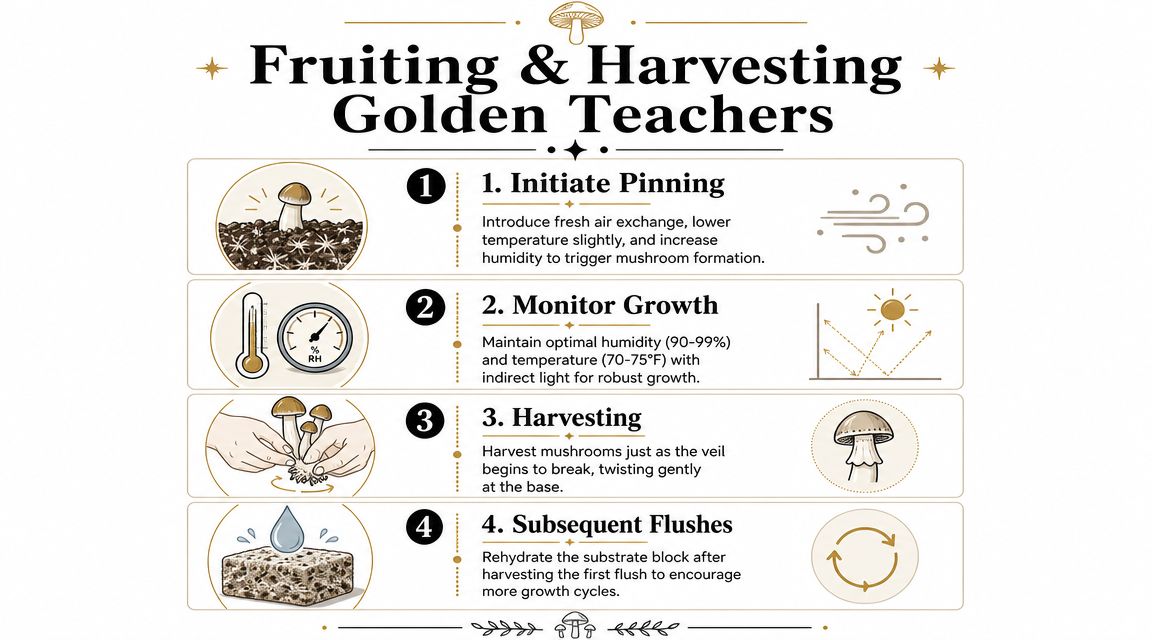
Fruiting starts after full colonization, when the substrate gets the cues that tell it to produce mushrooms instead of spreading further. For Golden Teacher, growers usually aim for temperatures around 70°F to 75°F (21°C to 24°C) with high humidity, steady fresh air exchange, and gentle light, as outlined in this Golden Teacher fruiting conditions guide. Strain reputation matters less here than clean technique and stable conditions.
Setting up fruiting conditions
The goal is a moist surface with enough fresh air to prevent stagnation. That balance takes a little judgment.
If the chamber walls stay lightly beaded and the substrate surface looks moist without pooling water, you are close. If droplets are collecting on the pins or puddling on the surface, back off the misting. If everything looks matte and dry, humidity is too low or airflow is too aggressive.
Light helps with orientation, not power. Indirect daylight or a simple blue-white grow light on a regular cycle is enough. Strong direct sun creates heat swings and dries the surface faster than many beginners expect.
A simple reference point helps:
| Stage | Temperature | Humidity | Light |
|---|---|---|---|
| Fruiting | 70°F to 75°F (21°C to 24°C) | High, with a moist surface but no pooling | Indirect natural light or a gentle blue-white light |
What to watch for once pins appear
Pins are delicate. Handling them, over-misting them, or fanning obsessively causes more problems than it solves.
Use a light touch and pay attention to what the mushrooms are showing you:
- Thin stems and small caps usually point to stale air
- Cracked caps or a dry-looking surface often mean low humidity
- Fuzzy growth at the base can happen with limited fresh air exchange
- Pooling water or soggy spots raise the risk of bacterial problems
Patience matters here. Good fruiting management usually looks boring from the outside. Minor adjustments beat constant intervention every time.
A visual walkthrough helps many beginners spot the transition from surface mycelium to pins to mature fruits:
Harvest at the right moment
The standard cue is the veil under the cap beginning to tear. That is the point I recommend for most home growers because the mushrooms are mature, easy to handle, and less likely to drop spores all over the tub if you wait too long.
Harvest gently with clean hands or gloves. A careful twist and lift usually removes the fruit without tearing up the surrounding surface. If a cluster is tightly packed, cut or separate it carefully instead of ripping out a chunk of substrate.
Timing matters. A tub can look unchanged at breakfast and overripe by evening once the larger fruits start opening.
Keep the excitement under control
Beginners usually lose ground here by trying to help too much. They mist every few hours, fan on a schedule instead of responding to conditions, and keep opening the chamber to check progress. That raises contamination risk and pushes the surface away from the stable, humid conditions fruiting needs.
This is also the point where it makes sense to be honest about risk outside the grow itself. Psilocybin cultivation can carry legal consequences depending on where you live, and those consequences matter more than whether you can get a second flush. If you are in Southeast Michigan and want to avoid the legal and sterile-work side of home cultivation, buying from a trusted local source is a practical alternative. Metro Mush also offers a useful guide on drying Psilocybe cubensis after harvest if you are comparing what post-harvest handling involves before deciding whether growing at home is worth it.
After the Harvest and Considering Alternatives
A lot of first grows are lost after harvest, not in the tub. Mushrooms that looked clean and healthy in the chamber can turn soft, stale, or moldy fast if drying is rushed or storage is sloppy.
Drying for stability
Dry them until they are fully brittle, not just dry on the surface. Low heat and steady airflow work better than trying to speed the process up with high temperatures, which can cook the outside while leaving moisture trapped inside the stem.
A dehydrator is the simplest tool for this job. Spread the fruits so air can move around them, check the thicker stems before calling them done, and do not rely on appearance alone. If a stem bends instead of snapping, keep drying.
For a step-by-step post-harvest method, Metro Mush has a practical guide on drying Psilocybe cubensis after harvest.
Once they are fully dry, store them in an airtight jar with a desiccant pack in a cool, dark place. If they regain any softness after a few days, moisture is still present. Dry them again before long-term storage.
Responsible use after a home grow
Growing your own does not make the end product predictable. Potency can vary from batch to batch, and the first flush is not always a reliable guide to what later fruits will feel like.
A few habits prevent common mistakes:
Start with a low amount
Treat a new batch cautiously, even if the mushrooms look similar to the last one.Label jars by grow and flush
Good labeling helps you track differences in strength, appearance, and storage time.Keep storage secure
Adult use still requires basic responsibility around household access.Avoid casual dosing because it feels familiar
Homemade does not mean mild, and comfort with the process can lead people to underestimate effects.
When buying makes more sense than growing
Home cultivation asks for sterile technique, patience, space, and a willingness to accept legal risk. For some people, that trade-off is worth it because they want the hands-on process. For others, the grow loses its appeal once they understand the legal exposure, contamination problems, and post-harvest work involved.
That is a reasonable conclusion.
For adults in Southeast Michigan, buying from a trusted local source can be the safer and simpler option. Metro Mush serves the Detroit and Ann Arbor area with dried mushrooms, chocolate products, drinks, and local delivery for adult consumers. That route avoids keeping a grow at home, avoids the sterile workflow, and avoids learning hard lessons through contaminated tubs and poorly stored harvests.
Growing teaches discipline. Buying reduces the legal and practical burden. Choose the path that fits your risk tolerance, your living situation, and the amount of work you are willing to take on.
If you're in Southeast Michigan and you've decided the better move is to skip the sterile workflow, contamination risks, and post-harvest prep, Metro Mush is one local option for adult consumers in the Detroit and Ann Arbor area. You can browse the menu online, check locations, and place orders by text if that route fits your situation better than growing at home.