



If you're trying to grow Psilocybe azurescens, you're probably already realizing this isn't a tub-on-a-shelf project. Most growers come to it after easier species and assume the same playbook will transfer. It usually doesn't.
Azurescens rewards patience, climate awareness, and habitat building. It punishes impatience, heavy hands with water, and any plan that treats a wood-loving coastal species like an indoor generalist. It also demands a serious safety mindset. Laws vary by location, and misidentification can be deadly. If you're not completely certain what you're growing or harvesting, stop there.
Understanding Psilocybe Azurescens and Its Demands
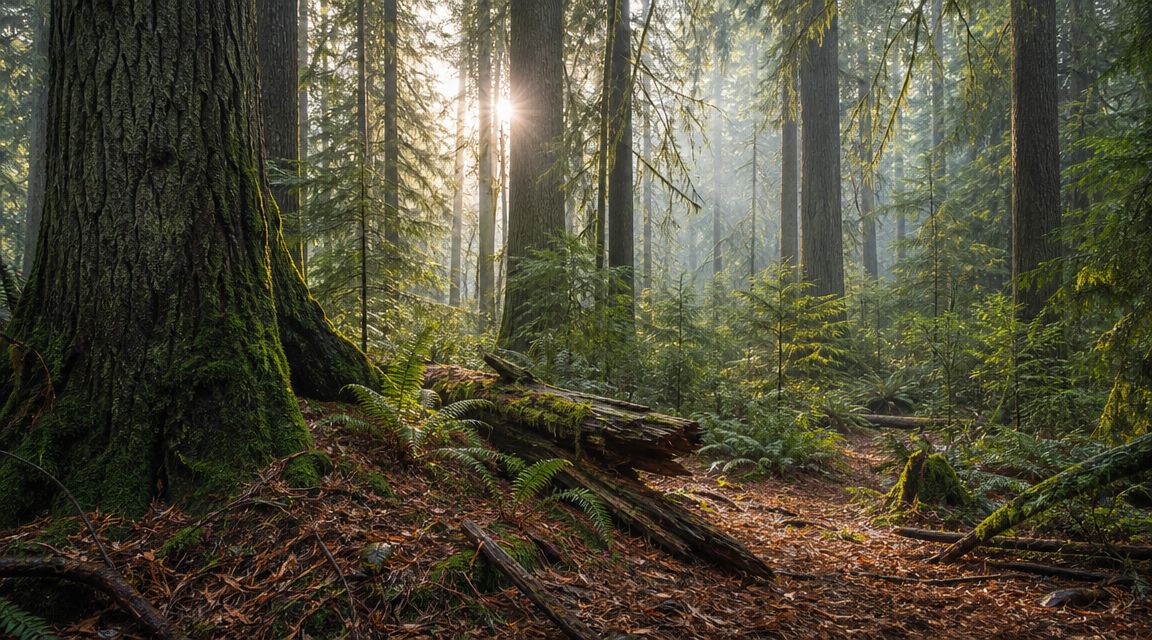
A grower spends spring expanding clean spawn, lays a bed of hardwood chips in deep shade, keeps it evenly moist through summer, then waits into the cold months before seeing whether the patch will produce. That is the basic shape of Psilocybe azurescens cultivation. It is slower, less forgiving, and far more dependent on outdoor conditions than the indoor species many hobbyists start with.
Psilocybe azurescens also deserves respect for its strength. It was formally described in 1996, and major reference summaries list it among the more potent naturally occurring psilocybin mushrooms, with high reported levels of psilocybin, psilocin, and baeocystin by dry weight. For a cultivator, that raises the stakes at harvest. Misidentification, casual handling, and dose guesses are bad habits with any mushroom. They are worse here.
Why this species changes the grower's mindset
Azurescens is a wood-loving, cool-season species associated with coastal woody debris and temperate outdoor conditions. That ecology should shape the whole project from the start.
Indoor growers often lose time by treating it like cubensis with a different substrate recipe. The better approach is habitat work. Build a patch that can hold moisture without becoming stagnant, feed the mycelium clean hardwood, protect it from direct sun, and let seasonal temperatures do the job they are supposed to do. Fruiting usually follows establishment, not forcing.
That is also why culture quality matters early. If you are still comparing genetics and formats, reviewing different Psilocybe spore syringe options can help separate collection material from what you need for a productive outdoor bed.
What works and what usually fails
The growers who get azurescens to fruit consistently usually accept a few facts up front:
- This is an outdoor project: Beds, chips, shade, airflow, and weather matter more than indoor gadgetry.
- Colonization comes first: A patch that runs hard through wood is promising. A patch that fruits on command is not the standard.
- Timing is seasonal: Warm weather helps expansion. Cooler, wetter conditions help trigger mushrooms.
- Mistakes take longer to fix: A contaminated jar wastes a week. A poorly built outdoor bed can waste an entire season.
I have seen healthy-looking summer beds fool people. Fast white growth in wood chips feels like progress, and sometimes it is. But azurescens can colonize aggressively and still fail to fruit if the bed is too exposed, too wet, too dry, or built from the wrong wood.
The core difficulty
The demanding part is not getting mycelium started. It is maintaining a stable patch long enough for that mycelium to establish itself, survive heat, resist competing fungi, and respond well when autumn conditions arrive.
That trade-off is what makes this species rewarding. It teaches patience better than almost any indoor grow ever will. Grow it like a habitat species, not a fast indoor crop, and your odds improve.
Essential Supplies for Outdoor Cultivation
A good azurescens setup looks more like a landscaping job than a lab fantasy. You still need clean culture work at the start, but the main build happens in a shaded outdoor bed with the right wood, the right moisture profile, and enough patience to let the mycelium claim territory.
Start with living culture, not wishful thinking
Spores can work for microscopy and early culture work, but for an outdoor patch, most growers want vigorous, clean mycelium before the bed ever gets built. That means agar work, liquid culture, colonized sawdust, or fully running wood-chip spawn. Starting with weak or uncertain material is one of the easiest ways to waste a season.
If you're still sourcing genetics and comparing formats, browsing different Psilocybe spore syringes can help clarify the difference between collection material and propagation-ready culture paths. Just don't confuse owning spores with being ready to establish a bed.
What to buy before you break ground
You don't need a huge pile of gear. You need the right materials.
- Colonized spawn: Sawdust spawn, wood-chip spawn, or another wood-friendly transfer material.
- Untreated hardwood chips: Choose clean hardwood. Avoid painted, pressure-treated, or suspicious wood waste.
- Supplemental sawdust if needed: Useful for helping spawn leap into a fresh bed.
- Cardboard or plain brown sheet mulch: Helps suppress grass and gives the patch a clean start.
- A shovel and rake: You're building a bed, not a sterile fruiting chamber.
- A hose with gentle flow: You want moisture control, not trench flooding.
- Mulch fork or gloved hands: For layering chips without compacting the bed.
- A shaded site marker: Stakes or simple markers help you avoid disturbing the patch later.
What experienced growers avoid
This species punishes bad materials more than beginners expect.
| Material choice | Better move | What to avoid |
|---|---|---|
| Wood source | Clean, untreated hardwood chips | Treated lumber waste, contaminated yard debris |
| Site | Shade or half-shade with drainage | Full sun, waterlogged low spots |
| Watering style | Gentle, measured soaking | Constant saturation |
| Build goal | Long-term patch establishment | Quick indoor flush mentality |
Cheap substrate is expensive when it carries contaminants or chemicals into a bed you expect to keep for years.
The trade-off that matters most
Indoor growers often spend money on plastic tubs, filters, and gadgets. Outdoor azurescens growers spend effort on site choice and substrate quality. That's the right trade.
If the chips are wrong, the site bakes in summer, or the bed stays swampy, no clever trick later will fix the foundation.
Building and Spawning Your Azurescens Patch
The patch should feel like part of your yard, not a temporary experiment. If you build it well, you're creating a perennial fungal bed rather than chasing a one-off flush.
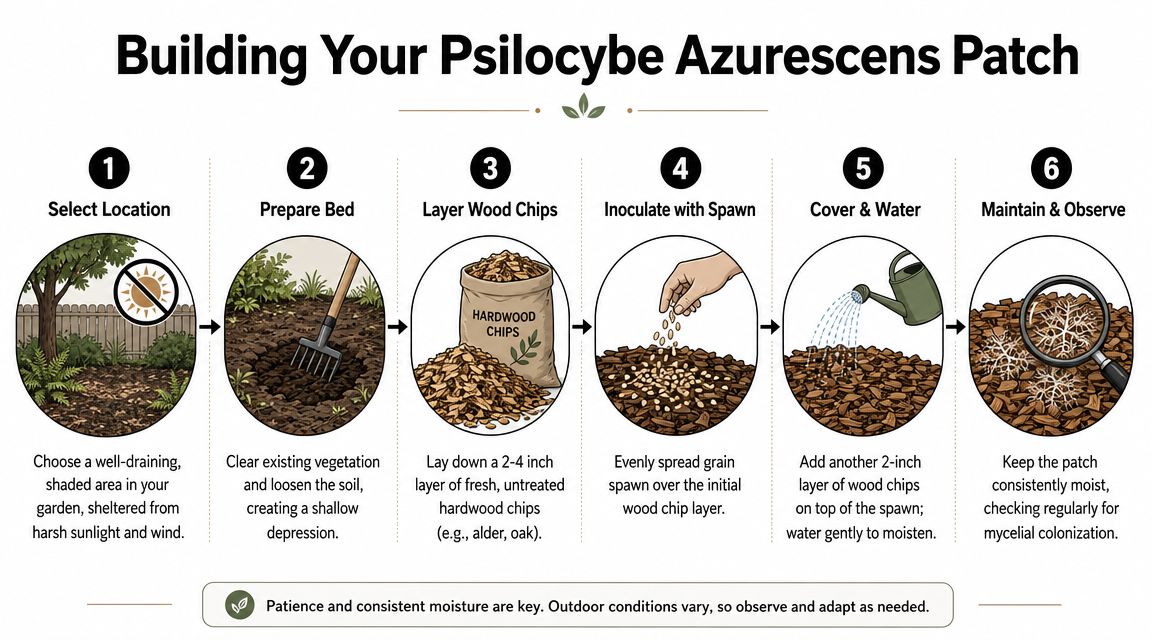
A practical cultivation workflow for azurescens is to start with colonized sawdust/bran or wood-chip spawn and move it into a shaded outdoor bed. One guide describes a bed as 15 to 20 cm deep, recommends a half-shaded location, and warns that overwatering in summer can cause aggressive mycelial growth without good late-autumn fruiting, as summarized in Cornell-linked outdoor cultivation guidance.
Pick the site like a landscaper
Look for a place with these qualities:
- Partial shade: Morning light is fine. Hard afternoon sun isn't.
- Drainage: After rain, the area shouldn't hold standing water.
- Low disturbance: Don't put the bed where pets, kids, or routine yard work will tear it up.
- Wind protection: Dry wind strips surface moisture faster than many growers notice.
A half-shaded edge near shrubs, fences, or deciduous cover often works better than an open lawn. Think forest edge, not vegetable garden.
Build the bed in layers
This is the basic method that works.
- Clear the area. Remove grass, weeds, and dense roots from the top layer.
- Make a shallow bed. Dig or rake out enough depth to support a proper wood layer.
- Lay cardboard if needed. This suppresses competing plants and gives mycelium a calmer launch.
- Add a base layer of hardwood chips. Keep it loose, not packed.
- Spread spawn evenly. Don't dump it all in one mound.
- Cover with more chips. The goal is contact across the bed, not isolated colonies.
- Water gently. Wet the substrate thoroughly, then stop before it turns muddy.
For growers scaling up clean inoculant before the outdoor transfer, mushroom liquid culture options are one way to develop vigorous mycelium for spawn production. The key is still the same. Move healthy culture into wood-based spawn before it ever hits the final bed.
A good bed is airy, moist, shaded, and left alone. A bad bed is compacted, soggy, and fussed over every other day.
Here's the common mistake. Growers see strong mycelial spread in warm weather and start watering harder because they think more visible growth means better fruiting later. With azurescens, that can backfire. You can build a thick, thriving bed that still fruits poorly if you train it into lush summer expansion without the right seasonal rhythm.
A short field demo can help visualize bed construction and outdoor handling:
Moisture is the real technical skill
Most beginners underwater once, panic, then overcorrect for weeks. Don't.
Use this simple check:
- If chips feel dry below the surface: Water.
- If the bed smells sour or stays slick: Back off.
- If the surface dries a little but the interior stays damp: That's usually fine.
- If you can squeeze water out of the substrate: You're overdoing it.
Azurescens likes humidity and moisture. It doesn't like being drowned. That's a major difference between a bed that colonizes steadily and a bed that turns into a maintenance problem.
Seasonal Timing and Fruiting Triggers
Azurescens teaches patience better than any lecture can. The patch has its own annual rhythm, and fruiting comes when the environment lines up, not when the grower gets impatient.
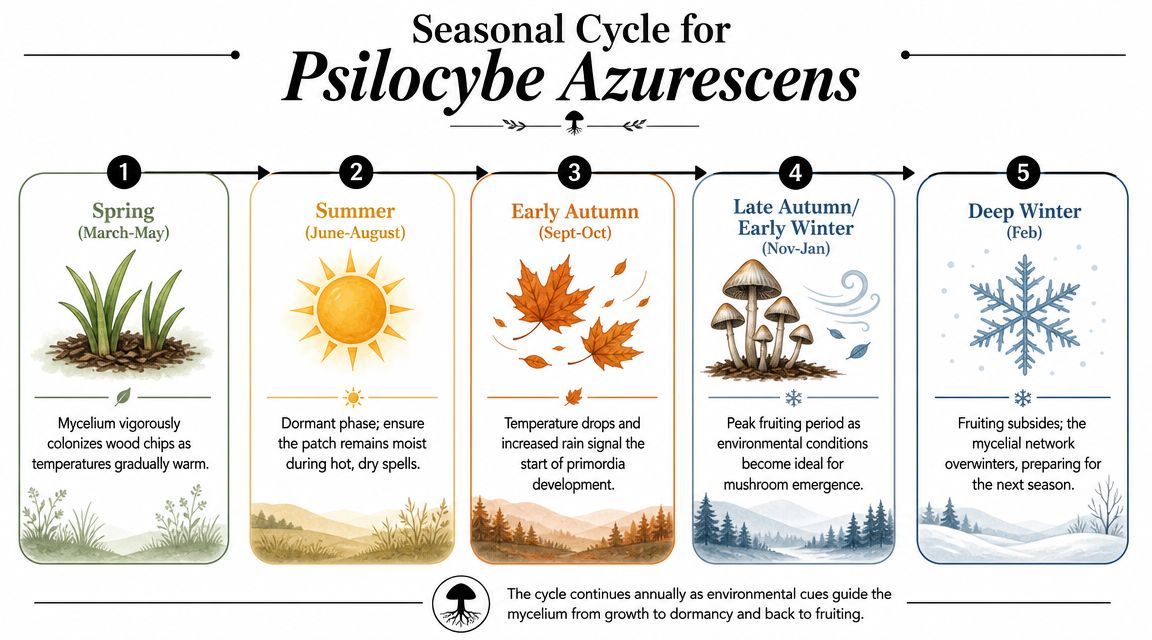
One recurring benchmark for fruiting is cool weather. A cultivation guide states that Psilocybe azurescens and P. cyanescens require about 50 °F (≈10 °C) to induce fruiting, and another notes that growth stops below 0 °C. The same guidance also recommends adding fresh wood chips in spring and notes that an established outdoor bed can produce in late autumn for years, according to Eric's guide to cultivating Psilocybe azurescens and cyanescens.
Read the year correctly
A healthy patch often follows a broad pattern:
| Season | What the patch is doing | What you should do |
|---|---|---|
| Spring | Recovering and expanding through wood | Feed lightly with fresh chips if needed |
| Summer | Holding and colonizing under stress | Protect moisture without saturating |
| Early autumn | Responding to cooling and humidity shifts | Leave it stable and avoid disruption |
| Late autumn | Fruiting window opens if conditions line up | Monitor closely and harvest carefully |
That sequence is why so many indoor-minded growers get frustrated. They want a direct trigger they can force. Outdoors, the trigger is a package deal. Temperature drop, moisture balance, established mycelium, and seasonal timing all have to cooperate.
Summer care decides autumn results
Most failed fruiting attempts are set up months earlier.
When summer turns hot and dry, many growers overmanage the bed. They soak it constantly, stir it, add too much fresh material at the wrong time, or relocate mulch layers trying to "help." Usually that just destabilizes the patch.
Keep the patch moist, not saturated, and undisturbed enough that the mycelium can settle into the season instead of reacting to constant intervention.
If your climate runs hotter than the species prefers, site design matters even more. Shade cloth, nearby shrubs, deeper chip coverage, and protection from baking afternoon exposure all matter more than clever indoor-style tricks.
For a closely related wood-lover that helps frame outdoor expectations, Metro Mush also has a Psilocybe cyanescens grow guide. The overlap is useful because both species reward growers who think in terms of wood beds, seasonal cooling, and habitat stability.
Feeding a patch without smothering it
Spring top-dressing can keep an established bed productive. Add fresh hardwood chips lightly and evenly. Don't bury a struggling patch under a heavy layer and expect magic. The goal is to provide new food while preserving airflow and the existing mycelial network.
Watch for these signs:
- Healthy expansion: White mycelium moving through lower wood layers.
- Dry stress: Chips shrinking, pale surface, little internal moisture.
- Overwet conditions: Dense matting, sour smell, or stagnant wet spots.
- Premature interference: Digging to check progress too often.
Good azurescens cultivation looks boring for long stretches. That's normal. The bed should spend more time consolidating than entertaining you.
Identifying, Harvesting, and Dosing Potent Mushrooms
Discipline is paramount. A successful patch means nothing if identification is sloppy or dosing is casual.
Identification comes before excitement
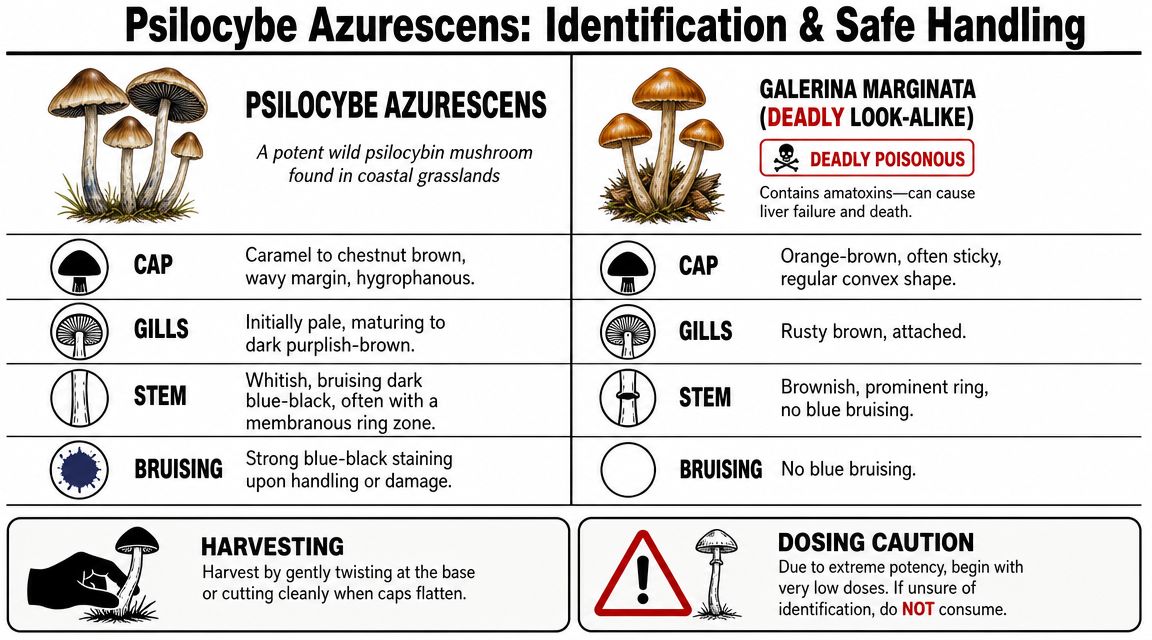
Psilocybe azurescens is typically recognized by a caramel to chestnut-brown cap, pale stem, darkening gills as it matures, and blue bruising when handled. In cultivated beds, though, those features should never be treated as enough on their own.
The dangerous problem is wood-loving lookalikes, especially Galerina marginata. If a mushroom is growing from a wood-chip bed, that fact alone doesn't make it safe.
Use a layered identification process:
- Check the cap shape and color: Azurescens often develops a more expressive margin as it matures.
- Inspect bruising carefully: Blue-black bruising supports identification, but absence or weak bruising on one specimen doesn't prove anything either way.
- Look at gill maturity: Mature spores should push the gills toward a dark purplish-brown appearance.
- Take a spore print: This is one of the simplest checks serious growers should never skip.
- Compare multiple specimens: Don't identify a patch from one odd mushroom.
If you have any doubt about a wood-loving mushroom, don't eat it. Outdoor cultivation does not remove the risk of deadly confusion.
Harvest cleanly and preserve the patch
Harvest when the mushrooms are mature enough to identify clearly and before decay, slug damage, or weather starts degrading them. Many growers twist gently at the base or cut cleanly with a blade. Either method can work if you're careful.
What matters more than the method is the handling:
- Don't rip up chunks of colonized substrate
- Don't stomp around the bed
- Don't leave damaged fruits to rot in dense clusters
- Do inspect every specimen individually
A calm harvest protects future flushes better than a fast one.
Dosing requires a smaller ego
Because azurescens is known for very high potency, this is not the species for casual estimates or bravado. The same potency data cited earlier is exactly why conservative handling matters. If someone is used to another species, they should assume that direct dose translation may be unsafe.
I strongly advise this position: start extremely low. Then wait. Then learn your response before doing anything more.
That isn't moralizing. It's practical harm reduction.
A safe approach includes:
| Decision point | Safer move |
|---|---|
| First experience with azurescens | Start with a very low amount |
| Uncertain specimen identity | Do not consume |
| Mixed batch from different harvests | Treat potency as inconsistent |
| Outdoor bed with lookalike risk | Verify each specimen separately |
Don't give potent mushrooms the benefit of the doubt. Make them earn your trust through careful identification, careful drying, and cautious personal testing.
Frequently Asked Questions About Growing Azurescens
Can you grow Psilocybe azurescens indoors
You can run culture and spawn indoors. Fruiting reliably is a different job, and this species usually does better outside in a wood-chip bed.
That difference matters. Psilocybe azurescens is a coastal, wood-loving mushroom that responds to seasonal cooling, moisture shifts, and the slower rhythms of an outdoor patch. Growers who treat it like an indoor cubensis project often end up with healthy mycelium and no mushrooms.
What's the biggest mistake new growers make
They expect speed.
New growers often overwater, disturb the bed too often, or try to force progress in the wrong season. Azurescens rewards patience more than intervention. Build the patch well, pick a suitable site, and give the mycelium time to settle into the wood.
How long does a patch stay productive
A healthy outdoor patch can fruit for multiple seasons, often in late autumn when conditions line up. Results depend on drainage, shade, wood quality, and how gently the bed is maintained over time.
I have seen modest beds outlast heavily managed ones primarily because they were left alone and fed with fresh chips at the right pace.
What if the bed colonizes aggressively but doesn't fruit
Strong colonization without fruiting usually points to timing, microclimate, or patch age. It does not automatically mean the grow failed.
Common causes include too much summer watering, a site that stays too warm into autumn, or a bed that still needs another season to mature. Repeated digging also sets beds back. Check moisture, shade, and temperature exposure before making major changes.
Should you add fresh chips every year
Often, yes. A light top-dressing in spring or after a fruiting season can keep the patch fed without smothering active growth.
Keep it light. Fresh hardwood chips help. Piling on a thick layer all at once can slow the bed and trap too much moisture.
What contamination matters outdoors
Outdoor cultivation is not sterile, and it should not look sterile. Insects, leaf litter, and other fungi will show up.
Key warning signs are persistent foul odor, slimy substrate, clear die-off, or one organism taking over large sections of the bed. If trouble is isolated, assess the area first instead of tearing out the whole patch. Poor drainage and excess water are common causes of decline.
How do you dry and store harvested mushrooms
Dry them fully before storage. Use clean airflow and low heat until there is no residual moisture left in the fruit.
Then store them in an airtight container away from light, heat, and humidity. Partially dried mushrooms spoil fast, and with a species this potent, sloppy storage creates unnecessary risk.
Is this a good first outdoor species
Usually not. Azurescens asks for more patience, better site selection, and more discipline than many beginners expect.
A small test patch is the smarter route for anyone set on learning this species. It limits waste, teaches more than a large first attempt, and makes it easier to correct mistakes next season.
If reading this has made one point clear, it should be this: azurescens cultivation is about matching habitat, not chasing speed. Serious growers who want a shortcut on the consumption side should still treat potency and sourcing with care.
If you'd rather skip the cultivation learning curve and explore curated psilocybin products for adult consumers in Southeast Michigan, Metro Mush offers a menu of dried mushrooms, chocolates, and drinks with local ordering options for the Detroit and Ann Arbor metro areas.