

A lot of people around Detroit and Ann Arbor are in the same spot right now. They've heard friends talk about psilocybin, seen local conversations around decriminalization, and started getting curious. Then they search how to grow at home and run into pressure cookers, monotubs, glove boxes, agar plates, and pages of forum jargon.
That’s usually where enthusiasm turns into hesitation.
If that sounds familiar, magic mushroom grow bags are often the cleanest entry point. They strip away much of the lab-like setup that scares beginners off and package the grow into one contained system. You still need patience, clean habits, and realistic expectations, but you don’t need to turn your spare room into a mycology workshop on day one.
Your First Step into Home Cultivation
A first-time grower in Southeast Michigan usually isn’t looking for a commercial setup. They’re looking for something understandable. Maybe they want to learn the process for themselves. Maybe they want a more hands-on relationship with strains they already know by name. Maybe they just want to stop feeling lost every time a grow guide starts talking like a chemistry manual.
That’s where grow bags make sense.
They lower the barrier between curiosity and action. Instead of building a full system from separate parts, you start with a single controlled container designed to support growth from inoculation through fruiting. For many adults, that feels less like a science project and more like a manageable hobby.
There’s also a confidence factor. Traditional methods often make beginners feel like one wrong touch will ruin everything. Grow bags don’t eliminate mistakes, but they do reduce the number of moving parts you have to control at once. That matters when you’re learning what healthy growth even looks like.
If you want to build background before buying anything, a few solid mycology books and learning resources can help translate the vocabulary so the process feels much less intimidating.
You don’t need to know everything before you begin. You need a simple system, a clean routine, and enough patience to let the fungi do their work.
What Exactly Is a Magic Mushroom Grow Bag
A magic mushroom grow bag is a sealed growing chamber that already contains the material mycelium needs to spread. For a new home cultivator, that changes the job from building an environment piece by piece to managing one prepared container carefully.
That distinction clears up a common misunderstanding. The bag is not just packaging around the grow. It is part of the cultivation system.
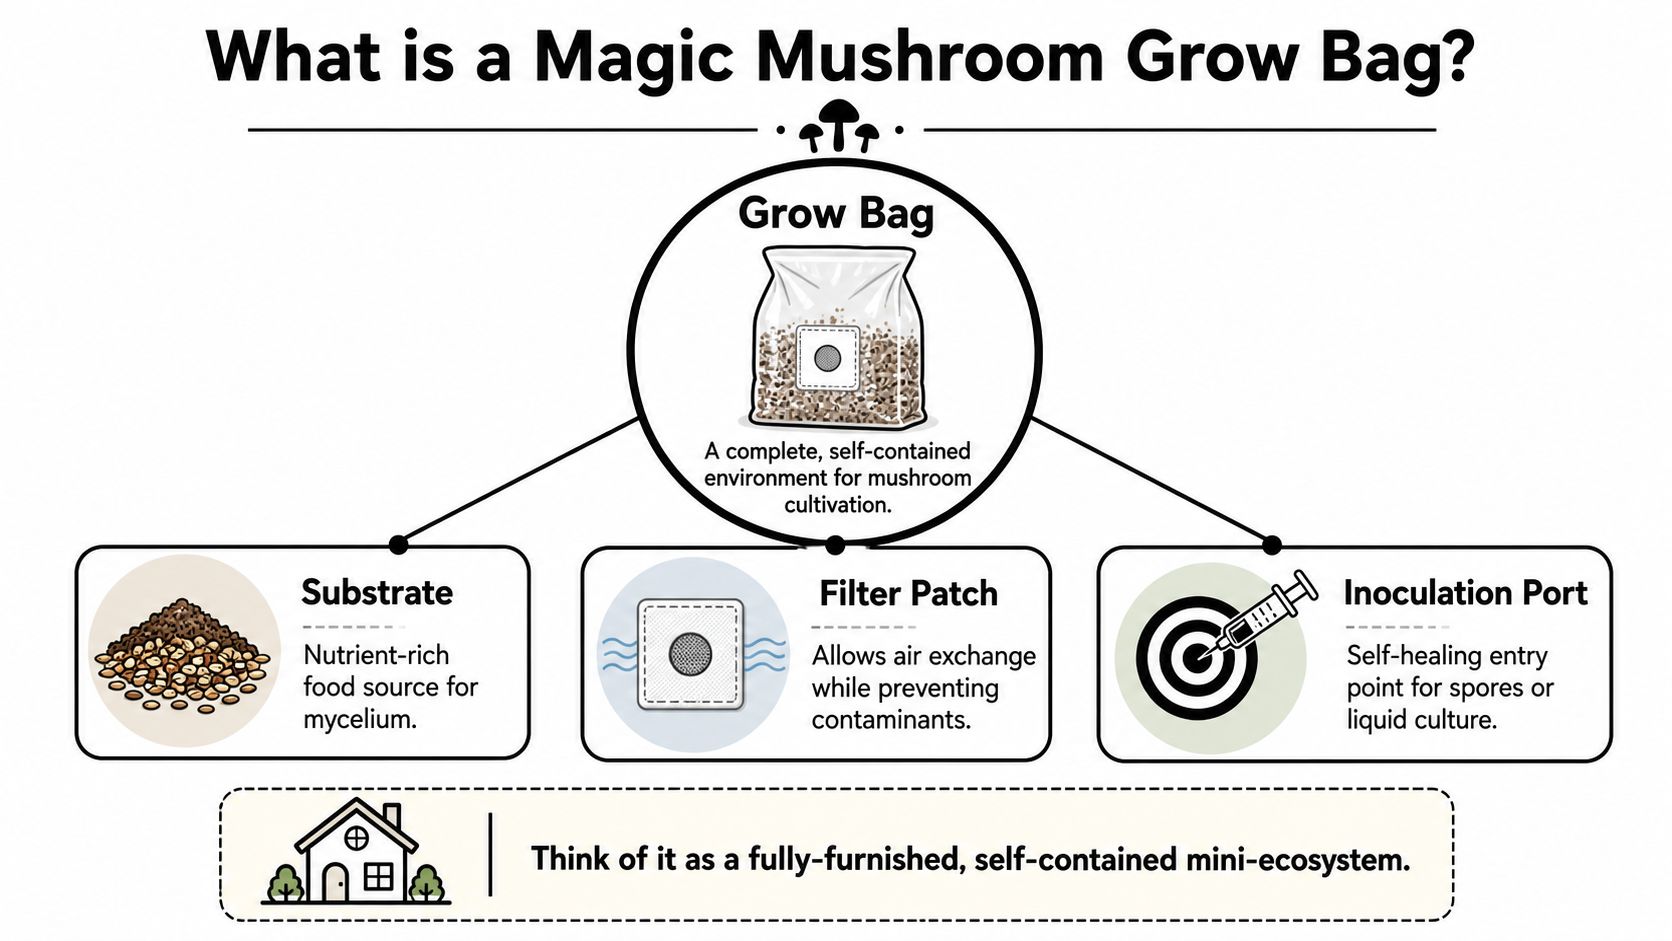
What’s inside the bag
Inside, you will usually find a prepared medium that feeds the fungus while holding the right amount of moisture. In all-in-one versions, that often includes sterilized grain spawn plus a bulk substrate such as coco coir, composted manure, hardwood sawdust, soybean hulls, or vermiculite. The exact recipe can vary by seller, but the purpose stays the same. Give the mycelium food, water, and a cleaner place to establish itself.
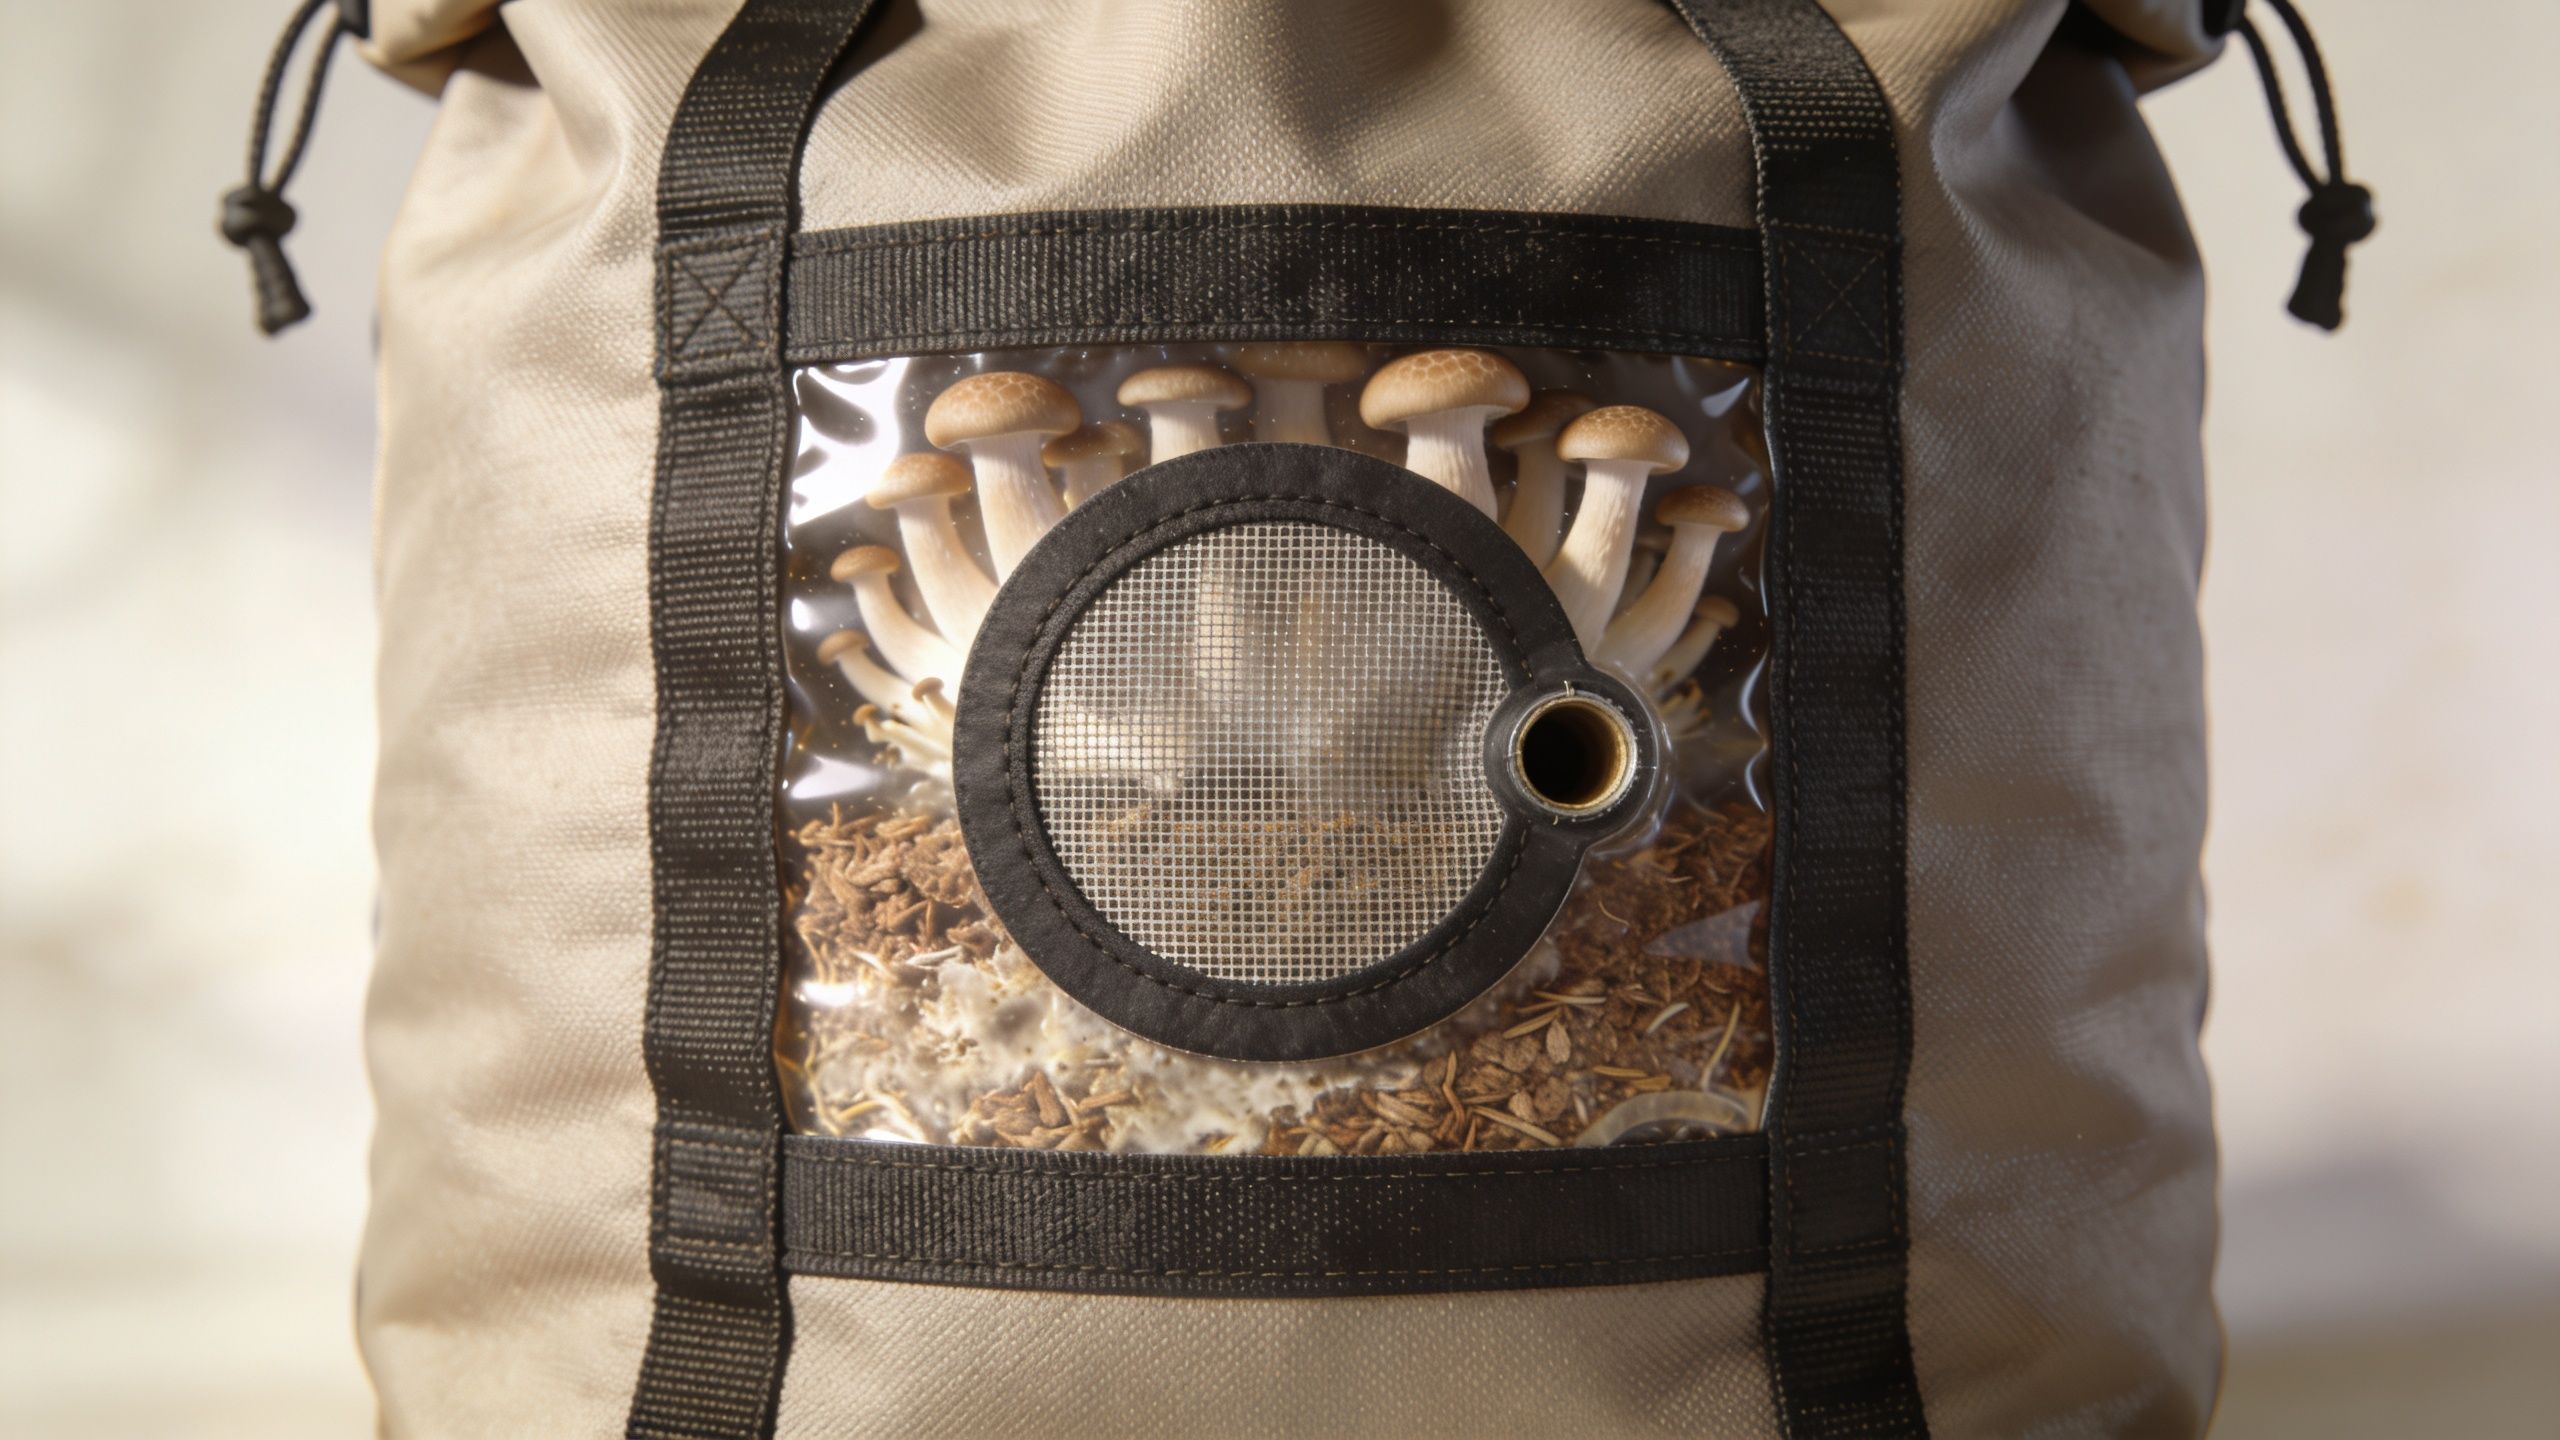
Two built-in parts tend to confuse first-time growers, especially adults in Michigan who are reading product pages for the first time and trying to separate marketing language from what matters.
- Filter patch: This section allows gas exchange while helping block mold spores, bacteria, and other unwanted hitchhikers from entering the bag.
- Injection port: This self-healing spot lets you introduce spores or liquid culture with a syringe without opening the bag.
That setup matters because contamination usually starts during exposure. Every time colonizing material meets open room air, the risk goes up.
How the process actually works
A beginner often brings a gardening mindset to mushrooms. They expect something like seed plus soil equals growth. Fungi work differently.
The first goal is mycelium. Mycelium is the white threadlike network that spreads through the food source and claims it. If you want a simple comparison, it behaves more like roots wiring through a loaf of bread than a plant sprouting leaves from dirt. The mushrooms are the final expression of a colony that has already settled in.
So after inoculation, the early stage looks quiet. You are waiting for white growth to move through the bag and knit the contents together. Once that network is established and the environment shifts toward fruiting conditions, mushrooms can begin to form.
Why growers like bags for early projects
Grow bags appeal to beginners because they reduce transfers, handling, and guesswork. Analysts at GroMagic explain in their overview of the science behind magic mushroom grow bags that the bag helps maintain the stable warmth, humidity, and gas exchange mycelium needs during colonization and fruiting.
For a Michigan hobby grower, that practical benefit is hard to overstate. Winter air indoors can be dry. Older homes in Southeast Michigan can have dusty basements, drafty rooms, and temperature swings that make open-air methods harder to manage. A bag does not fix every problem, but it gives you fewer failure points to watch at once.
That is also why people trying to reproduce the kind of clean, reliable results they hope for from familiar varieties sold by shops like Metro Mush often start here first. A grow bag gives you a more controlled place to learn what healthy mycelium looks like before you experiment with more exposed methods.
Practical rule: If the bag stays sealed and your inoculation is clean, you remove many of the easiest chances for contamination to enter.
The short version is simple. A grow bag is a prepared micro-environment for fungal growth. Once you understand that, the product stops looking like a mystery item and starts making sense as a tool.
Decoding the Features of a Quality Grow Bag
A quality grow bag earns its keep before you inoculate it. For a Michigan home grower, that matters because many failed first grows are not caused by bad genetics or bad intentions. They start with weak materials, poor gas exchange, or a bag design that creates extra chances for contamination.
Three features deserve your attention first. The bag film. The filter patch. The injection port.
Why polypropylene matters
The bag material has to tolerate heat during preparation and stay stable while moisture builds inside. Quality bags are commonly made from 3 to 5 mil polypropylene, a heat-safe plastic used because it can hold up under sterilization conditions that would warp or weaken ordinary thin plastic, as explained in Mondo Grow Kits' comparison of grow kits and grow bags.
For a beginner, the practical takeaway is simple. Better plastic reduces the chance of small failures that show up later as contamination, drying, or split seams. If a bag feels flimsy or the welds look sloppy, treat that as a warning sign.
The filter patch controls breathing without opening the door
Mycelium uses oxygen and releases carbon dioxide as it colonizes. A good bag has to let that exchange happen while still blocking unwanted microbes.
This is why the filter patch matters so much. A well-made patch creates controlled airflow. Poorly designed patches can choke the culture or let in contaminants. Some bags list a 0.2 micron filter patch, which is a common choice for keeping the interior protected while still allowing gas exchange. You do not need to memorize micron ratings, but you should look for a patch that is clearly described instead of vaguely shown in product photos.
A simpler way to judge it is this. The culture should be able to breathe without you opening the bag.
The injection port reduces one of the easiest beginner mistakes
The self-healing injection port gives you a clean entry point for spores or liquid culture. That matters because opening the bag, even briefly, gives mold spores and bacteria a chance to enter.
Good ports are usually made from silicone that reseals after the needle is removed. The technical specs are less important than the result. You want a port that stays closed after inoculation and does not turn one quick step into a hidden leak.
If you are trying to get steady results from a strain similar to one you have already enjoyed from a shop like Metro Mush, consistency matters here. Clean inoculation does not guarantee success, but it removes a very common reason first projects fail.
What to check before you buy
Use this short checklist before you commit:
- Polypropylene construction: Avoid generic plastic with no material details.
- A clearly labeled filter patch: Breathing room for mycelium should be part of the design, not a guess.
- A self-healing injection port: This lowers handling and keeps the sterile interior protected.
- Strong seals and a clear viewing area: You want to inspect growth without touching or opening anything.
Cheap bags usually fail unnoticed. You may not notice the problem until growth stalls or contamination appears.
A good grow bag does not produce mushrooms on its own. It gives you a cleaner, more predictable starting point, which is exactly what a first-time grower in Southeast Michigan usually needs.
All In One vs Substrate Bags Which Is for You
You buy a grow bag, get home, and then realize there are really two different products hiding under the same label. One is closer to a starter kit. The other is closer to a build-it-yourself setup. That distinction shapes how hard the process feels, how many things can go wrong, and how much control you have over the final grow.
An all-in-one bag contains both grain and fruiting substrate in a single sealed bag. A substrate-only bag contains only the bulk substrate, so you need to add colonized grain spawn later. If you are still sorting out how spores, liquid culture, and grain spawn relate to each other, this guide to mushroom liquid culture and how growers use it can clear up the terminology.
The practical difference
All-in-one bags reduce the number of separate jobs you need to get right.
Substrate-only bags ask you to manage more of the process yourself. That can be appealing if you already know what healthy colonized grain looks like and you want more control over genetics, timing, or bag size. It can also create more opportunities for contamination if your technique is still developing.
A simple way to frame it is this. An all-in-one bag works like buying a cake mix with the dry ingredients already measured. A substrate-only bag is closer to baking from separate containers in your kitchen. You can make something excellent either way, but the second route gives you more chances to mismeasure, spill, or introduce a problem.
Grow bag comparison
| Feature | All-in-One Bag | Substrate-Only Bag |
|---|---|---|
| Best for | Absolute beginners and cautious first-timers | Growers who already have colonized grain spawn |
| What’s inside | Grain plus bulk substrate in one bag | Bulk substrate only |
| Learning curve | Lower | Higher |
| Handling steps | Fewer | More |
| Contamination exposure | Lower because fewer transfers are needed | Higher because transfers introduce more risk |
| Control over genetics | Limited by what you inoculate directly into the bag | More flexible if you already run your own spawn workflow |
| Typical use case | First home grow, simple personal project | More customized grows and intermediate setups |
Why beginners usually do better with all-in-one bags
The main advantage is not magic. It is fewer handoffs.
Each time you transfer material from one container to another, you create a moment where mold spores, bacteria, or unclean tools can interrupt the project. First-time growers in Michigan often underestimate that part because the bag itself looks simple. The hidden difficulty is not waiting for mycelium. The hidden difficulty is staying clean through every step.
That is why all-in-one bags fit so many first grows. You inoculate once, leave the system closed, and spend more of your attention watching growth instead of managing transfers. If your goal is to get a reliable result from genetics similar to products you have already enjoyed from Metro Mush, simplicity usually beats customization on round one.
When a substrate-only bag is the better fit
Substrate-only bags make sense once you already trust your spawn process.
They are useful for growers who want to choose their own grain, run multiple genetics, or fine-tune each stage separately. That extra control can improve consistency in experienced hands. For a newer hobbyist, though, it can feel like trying to learn stick shift in city traffic. You are not just growing. You are also judging spawn health, timing transfers, and keeping everything clean while you work.
If any part of that still feels uncertain, a substrate-only bag can turn a fun home project into a frustrating one.
A Michigan-friendly way to decide
Use your actual starting point, not your ideal one.
- Choose all-in-one if you want the fewest failure points and the clearest first experience.
- Choose all-in-one if you are still learning how inoculation and colonization fit together.
- Choose substrate-only if you already have healthy colonized grain spawn and know how to transfer it cleanly.
- Choose substrate-only if you enjoy experimenting and you are comfortable troubleshooting slow growth or contamination.
The best bag is the one that matches your current skill level and your tolerance for risk.
Some new growers assume the more advanced setup must be the smarter choice. Usually, the smarter choice is the one you can finish well.
Your First Grow Bag Cultivation Simplified
You sanitize the counter, set the bag down, and suddenly the whole project feels bigger than it did in your cart. That feeling is normal. A first grow usually goes better when you treat it like a four-stage routine instead of one big technical challenge.
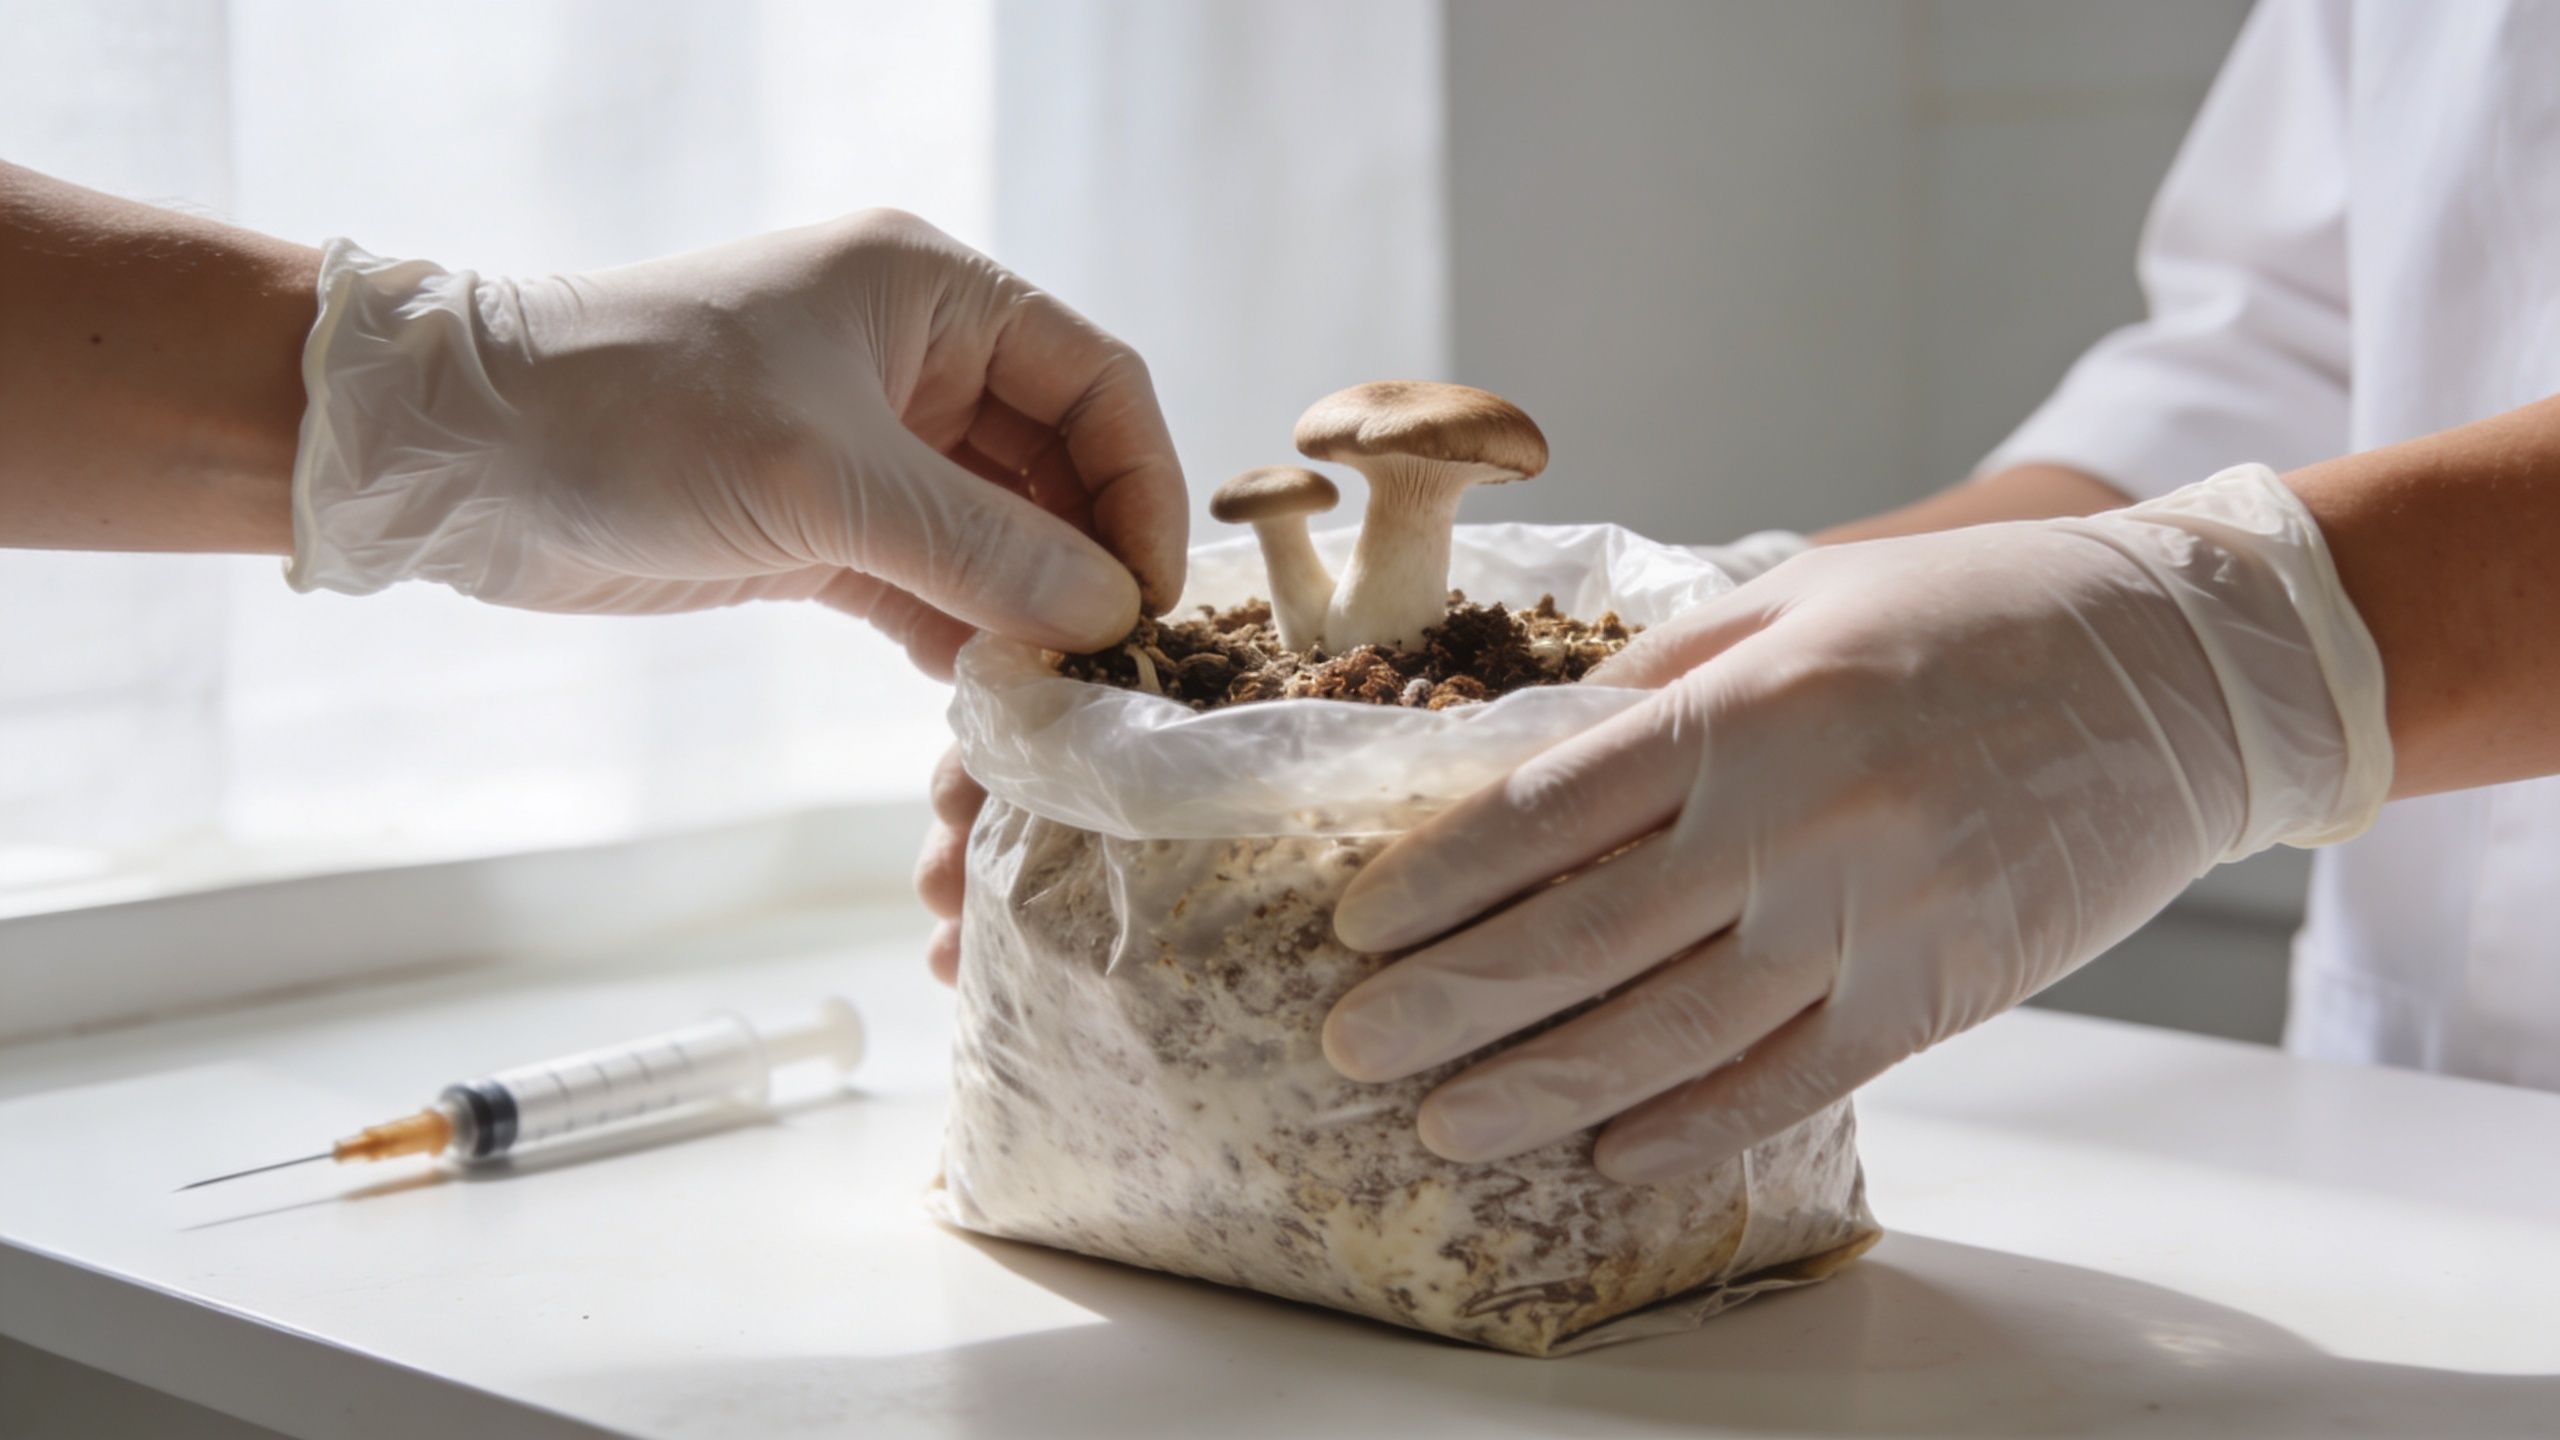
Stage one begins with inoculation
Inoculation is the starting point. You introduce spores or culture into the bag, then let the mycelium begin claiming its food source.
For many Michigan hobby growers, liquid culture feels easier to understand because it gives you a more direct starting material than spores. If the terms still blur together, this guide to mushroom liquid culture basics can clear up what you are putting into the bag and why that choice affects consistency.
Clean setup matters more than speed. Wipe the surface, clean your hands, organize your tools, and inject through the self-healing port without opening the bag. After that, leave it alone. New growers often lose confidence and start squeezing, rotating, or rechecking the bag right away. That extra handling creates problems far more often than it solves them.
Stage two is colonization
Now the bag looks quiet, but a lot is happening. Mycelium spreads through the grain or substrate the way plant roots spread through soil, except it is building a dense white network you can often see from the outside.
This phase can test your patience. Some bags show steady white growth early. Others seem to stall, then pick up later. What matters most is the overall pattern. Healthy progress usually looks like clean white expansion, not random color changes or wet patches.
If your bag instructions call for a break-and-mix step, wait until the bag is colonized enough to justify it. Mixing too early is like stirring cake batter before the ingredients have come together. You slow the process and can spread trouble through areas that were still clean.
Stage three shifts the bag into fruiting
Once the bag is fully colonized, the goal changes. The fungus has already occupied its food. Now you are giving it the environmental cues that tell it to produce mushrooms.
Beginners often get stuck here because fruiting sounds more complicated than it is. You are usually adjusting fresh air, humidity, and moisture balance so the bag senses it is time to reproduce. It helps to picture colonization as the building phase and fruiting as the harvest phase. Same organism, different job.
This visual walkthrough can help the sequence click if you learn better by watching than reading.
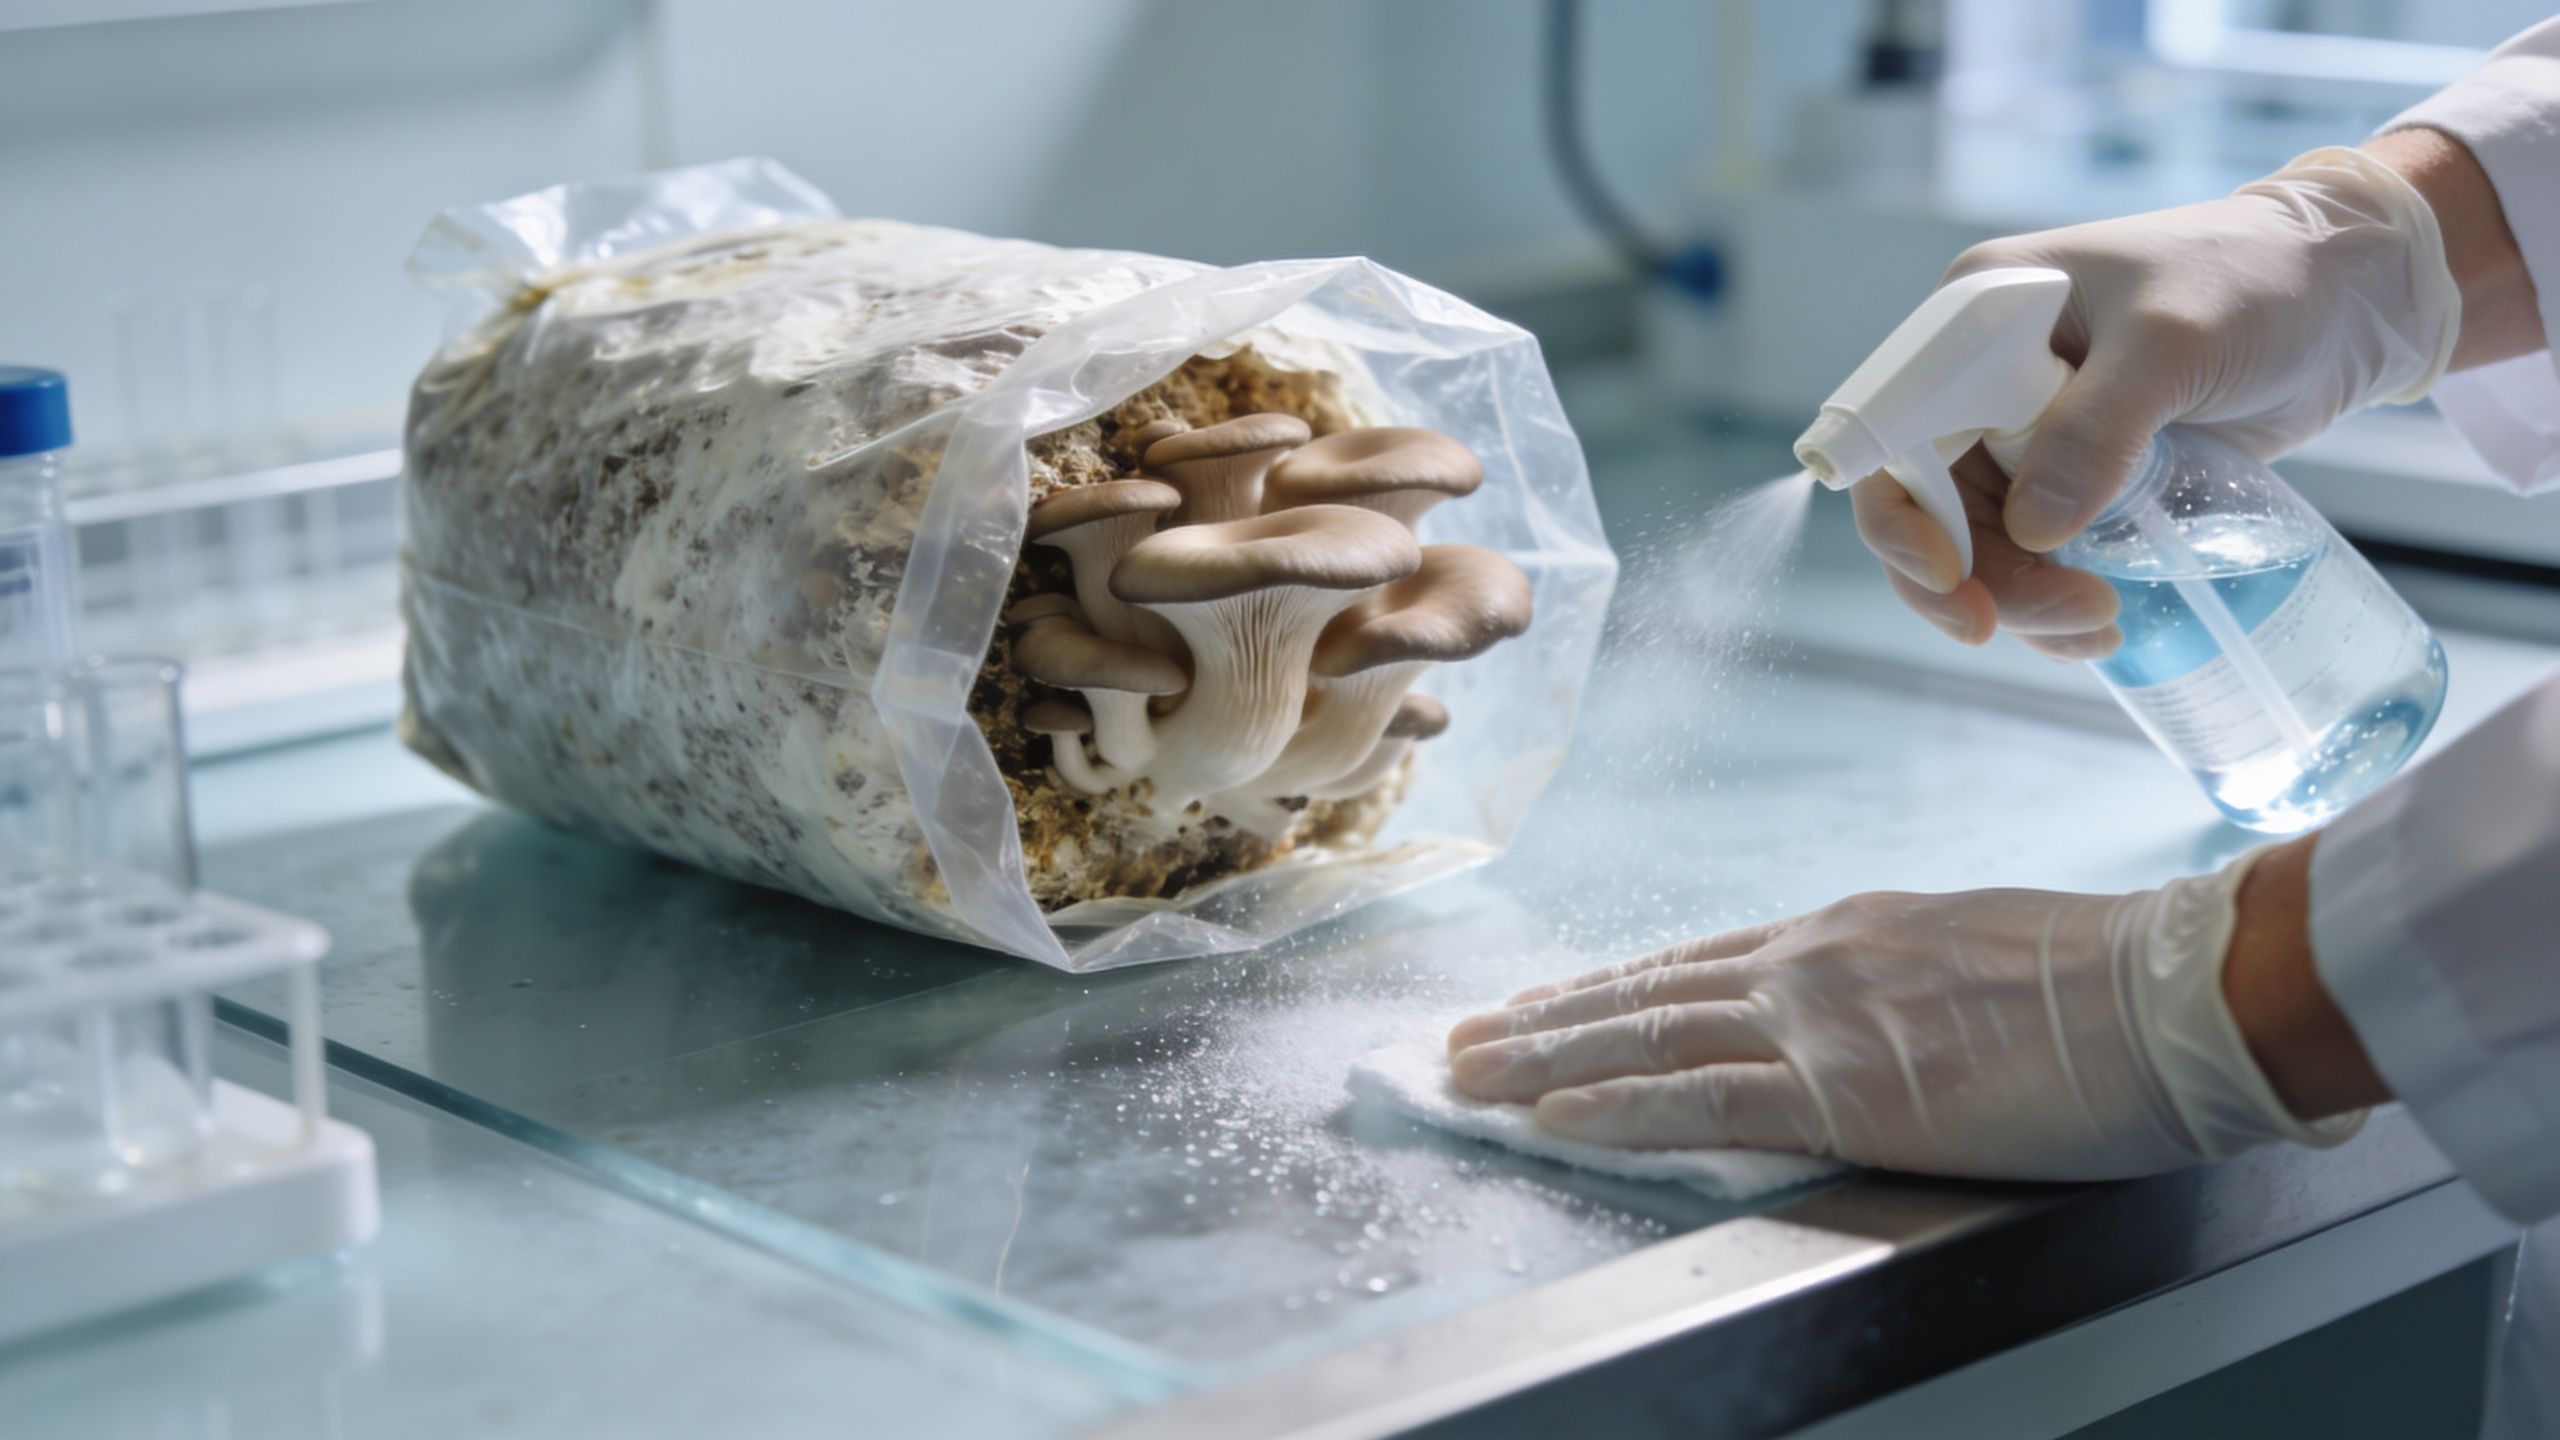
Stage four is harvest and recovery
Harvesting is gentler than many first-timers expect. You want to remove mature fruits cleanly without damaging more of the surface than necessary.
One reason grow bags appeal to new cultivators is that the project may not end after one flush. A healthy block can keep producing, which gives you more chances to observe how timing, moisture, and handling affect results. That kind of repetition is useful if your long-term goal is to get more predictable outcomes from the same kinds of genetics or product profiles you already know from Metro Mush.
What beginners usually get wrong
A first grow usually runs into trouble for a handful of repeat reasons:
- Checking too often: Every extra touch adds contamination risk and interrupts stable conditions.
- Changing the setup too fast: Big swings in temperature, airflow, or moisture can confuse the grow.
- Reading delay as failure: Fungi do not work on a human schedule.
- Skipping the bag's instructions: Small differences in bag design affect when to mix, vent, or fruit.
Healthy cultivation often looks uneventful for long stretches. That is usually a good sign.
Your job is simple, but it is not passive. Keep the process clean, follow the bag's timing, and resist the urge to overcorrect. For a first bag, that discipline usually matters more than any advanced trick.
Avoiding Contamination and Other Common Pitfalls
Most beginner failures don’t happen because the person “isn’t good at growing.” They happen because contamination prevention gets treated like a side note. It isn’t. It’s the center of the project.
Verified guidance on grow bag education points out that mainstream content often sells ease while skipping the failure modes that frustrate new growers most, especially contamination and environmental control, as noted by this cultivation content analysis.
What contamination can look like
Beginners often worry because they don’t know what’s normal. Healthy mycelium is generally white. Trouble tends to show up as unusual color, texture, or smell.
Watch for these warning signs:
- Green mold: Often associated with Trichoderma. If you see green developing in or on the substrate, don’t assume it will fix itself.
- Gray wispy growth: This can resemble cobweb-like contamination rather than dense healthy mycelium.
- Wet, sour, or rotten signs: Bacterial problems often announce themselves through smell or slimy texture rather than dramatic color.
You don’t need to become a contamination detective overnight. You just need to notice when growth doesn’t look white, clean, and consistent.
Prevention beats rescue
Once contamination is established, your options shrink fast. That’s why sterile habits matter more than miracle fixes.
Keep these rules simple:
- Sanitize your workspace: Clean the surface before inoculation.
- Handle the bag less: Curiosity is one of the biggest contamination risks.
- Don’t open the bag casually: Every unnecessary opening invites outside organisms in.
- Store it somewhere stable: Wild temperature swings and chaotic handling make success less likely.
The still-air mindset
You’ll hear growers talk about a “still air box.” Even if you’re not building one right away, the idea is useful. Moving air carries particles. Fewer airborne particles moving around your work area means fewer chances for contaminants to land where they shouldn’t.
That mindset should shape your whole routine. Move slower. Set things up before you begin. Don’t inoculate in a busy kitchen with people walking by and vents blowing.
Clean technique feels excessive right up until the moment it saves your grow.
Don’t confuse simplicity with carelessness
Grow bags are simpler than many older methods, but they’re not “set it anywhere and forget it forever” products. They reward a specific kind of discipline. Quiet handling, stable conditions, and realistic observation.
If you remember one thing, remember this. A successful grow usually comes from doing a few basic things consistently well, not from doing a lot of advanced things.
Legal Status and Sourcing in Southeast Michigan
You’re standing in your kitchen with a fresh grow bag on the counter, sterilized syringe ready, and one question keeps interrupting the excitement. Is this legal where I live?
For Southeast Michigan readers, the plain-English answer is that local policy has shifted, but the rules are still uneven. Psilocybin remains illegal under federal law. At the local level, cities such as Ann Arbor and Detroit have taken decriminalization steps that changed enforcement priorities and made public discussion of cultivation more common. That change matters, but it does not create a simple statewide green light for every use, purchase, or growing situation.
A good way to read the situation is to separate attention from permission. Decriminalization often means lower local enforcement priority. It does not always mean regulated retail access, clear commercial rules, or zero risk. That distinction trips people up, especially first-time growers who hear “decriminalized” and assume “fully legal.”
Michigan consumers should also keep sourcing decisions practical. A grow bag is only one part of the project. You still need clean technique, realistic expectations, and patience with strains that may behave differently from one another. Some varieties sold by local providers are known for being less forgiving during cultivation, which is one reason many hobby growers start small before trying anything more demanding.
If you want context before deciding whether to grow or buy, this guide to magic mushrooms in Michigan gives a useful state-specific starting point.
Home cultivation appeals to people who like learning by doing. You watch the process, troubleshoot problems, and get a better feel for how mushrooms respond to handling, moisture, and time. It can also be frustrating. One contaminated bag or one poorly timed step can erase weeks of progress, which is why this choice feels different from buying a finished product.
Some adults in Southeast Michigan decide to treat cultivation as the hobby and finished products as the reliable option. That approach makes sense if you want to learn without tying all your expectations to your first bag. Others skip growing altogether because they want consistency, convenience, and less trial and error.
Both choices are reasonable.
The smart move is to check your local rules, stay honest about your skill level, and source with care. If your goal is a successful first project, patience and good information matter as much as enthusiasm.