
When it comes to flavor and texture, nothing is more important than knowing exactly when to harvest your blue oyster mushrooms. You've put in the work to grow them, and this is the final, crucial step. Harvest too early, and you'll miss out on a significant amount of yield. Wait too long, and you'll end up with tough, leathery mushrooms that have lost their delicate texture.
The perfect moment is a narrow window—right when the caps have flattened out but just before their edges start to flip upward.
The Perfect Moment to Harvest Blue Oyster Mushrooms
Figuring out when to pick your blue oysters might seem like a bit of a guessing game at first, but it's a skill you'll pick up quickly by watching for a few key signs. Forget about size or color as your main guides; for blue oysters, it’s all about the shape of the cap and its edges.
A young, growing mushroom will have a cap that's clearly rounded, almost like a little dome, with its edges rolled tightly underneath. As it gets closer to ready, that cap will expand and flatten, starting to look more like a small, beautiful shelf.
This is where your timing has to be spot on. You want to harvest the cluster just as the largest caps have gone almost completely flat but are still angled slightly downward. If you see the edges starting to turn up, they're past their prime. At that point, the mushroom is focused on releasing spores, and its texture will suffer. Blue oyster mushrooms (Pleurotus ostreatus var. columbinus) are delicate, and their quality drops fast once they move past that optimal harvest window.
Key Visual Harvest Indicators
To nail the timing every single time, seasoned growers look for three main visual cues. Get these down, and you’ll be harvesting like a pro.
- Cap Shape and Edge: Your main focus should be on the caps. You're looking for them to have transformed from a rounded dome to a mostly flat shape. The critical detail is the edge—it should still be turned down slightly. We call this the ‘cap curl’ sweet spot.
- Gill Exposure: On an immature mushroom, the gills are tucked away and hidden by that rolled cap edge. As it reaches peak readiness, the gills become fully visible and perfectly defined. If the cap starts turning up and exposing the gills to the sky, you’ve waited a bit too long.
- Color Fading: While it's not the most reliable sign on its own, you'll see the color change as the mushroom matures. That deep, vibrant blue of a young mushroom will soften into a lighter blue-gray, sometimes almost silvery, as the cap expands. This color shift almost always happens right alongside the change in cap shape.
To help you make the right call, here’s a quick-reference table that breaks down the key indicators.
Quick Harvest Indicators for Blue Oyster Mushrooms
| Indicator | Sign of Peak Readiness (Ready to Harvest) | Sign of Being Too Early or Too Late |
|---|---|---|
| Cap Shape | The largest caps in the cluster are almost completely flat, like a shelf. | Too Early: Caps are still dome-shaped or convex. Too Late: Caps are wavy or funnel-shaped. |
| Cap Edge | Edges are still slightly curled downward. This is the most critical sign. | Too Early: Edges are tightly rolled under. Too Late: Edges are curled or turned upward. |
| Gills | Gills are fully visible and well-defined. | Too Early: Gills are mostly hidden. Too Late: Gills are fully exposed and dropping a lot of white spores. |
| Texture | Caps feel firm and pliable. | Too Early: Small and dense. Too Late: Can feel leathery, brittle, or papery. |
Think of this table as your field guide. When you see the signs in the "Ready to Harvest" column aligning, especially the cap edge, it's time to act.
This visual guide puts it all together, showing how the cap's curl is the ultimate signal.
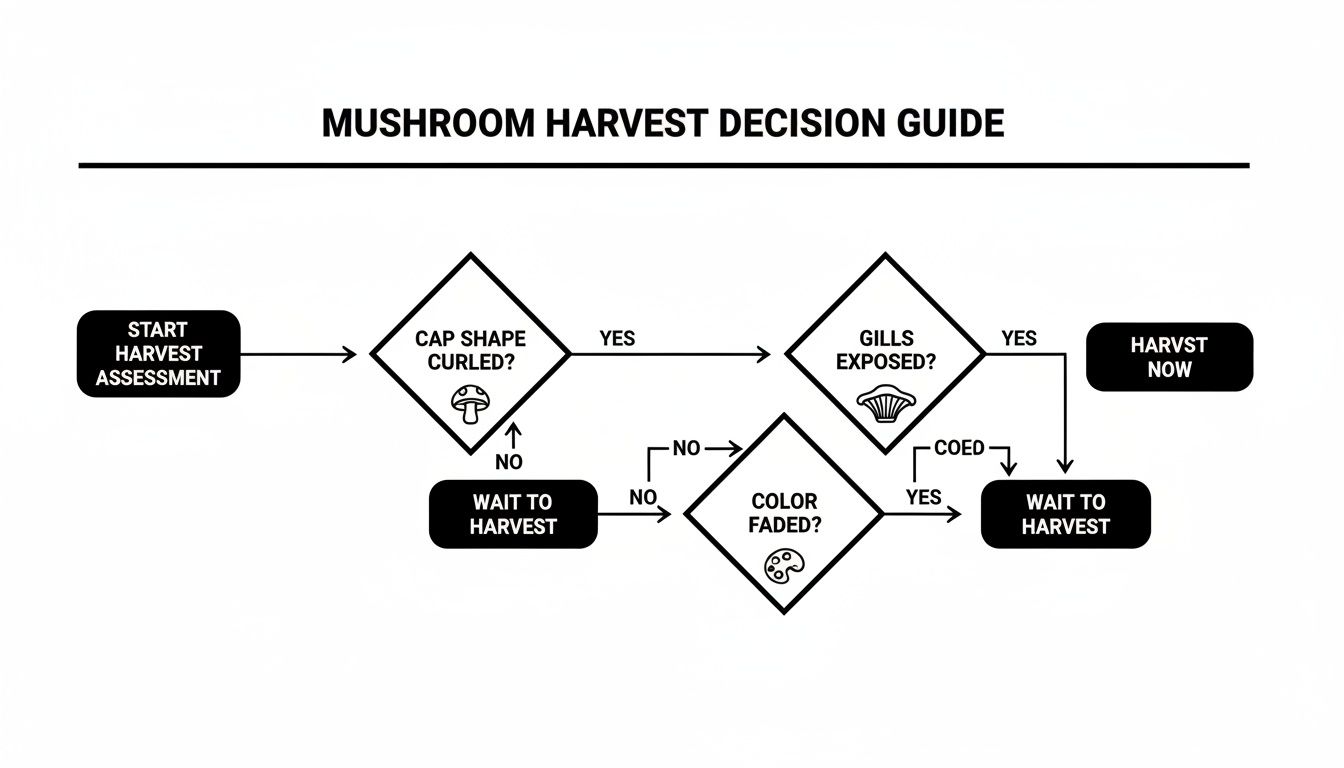
As you can see, a flat cap with a downward-curling edge is your green light. Once that edge flips up, the ideal window has closed.
Reading the Subtle Signs of a Ready Mushroom Cluster
Figuring out when to harvest your blue oyster mushrooms feels a bit like learning a new language. The signs are subtle at first, but once you know what to look for, you’ll see them clear as day. To get it right, you need to train your eye to see more than just the size of the cluster. The real secret is in how the mushroom's cap changes.
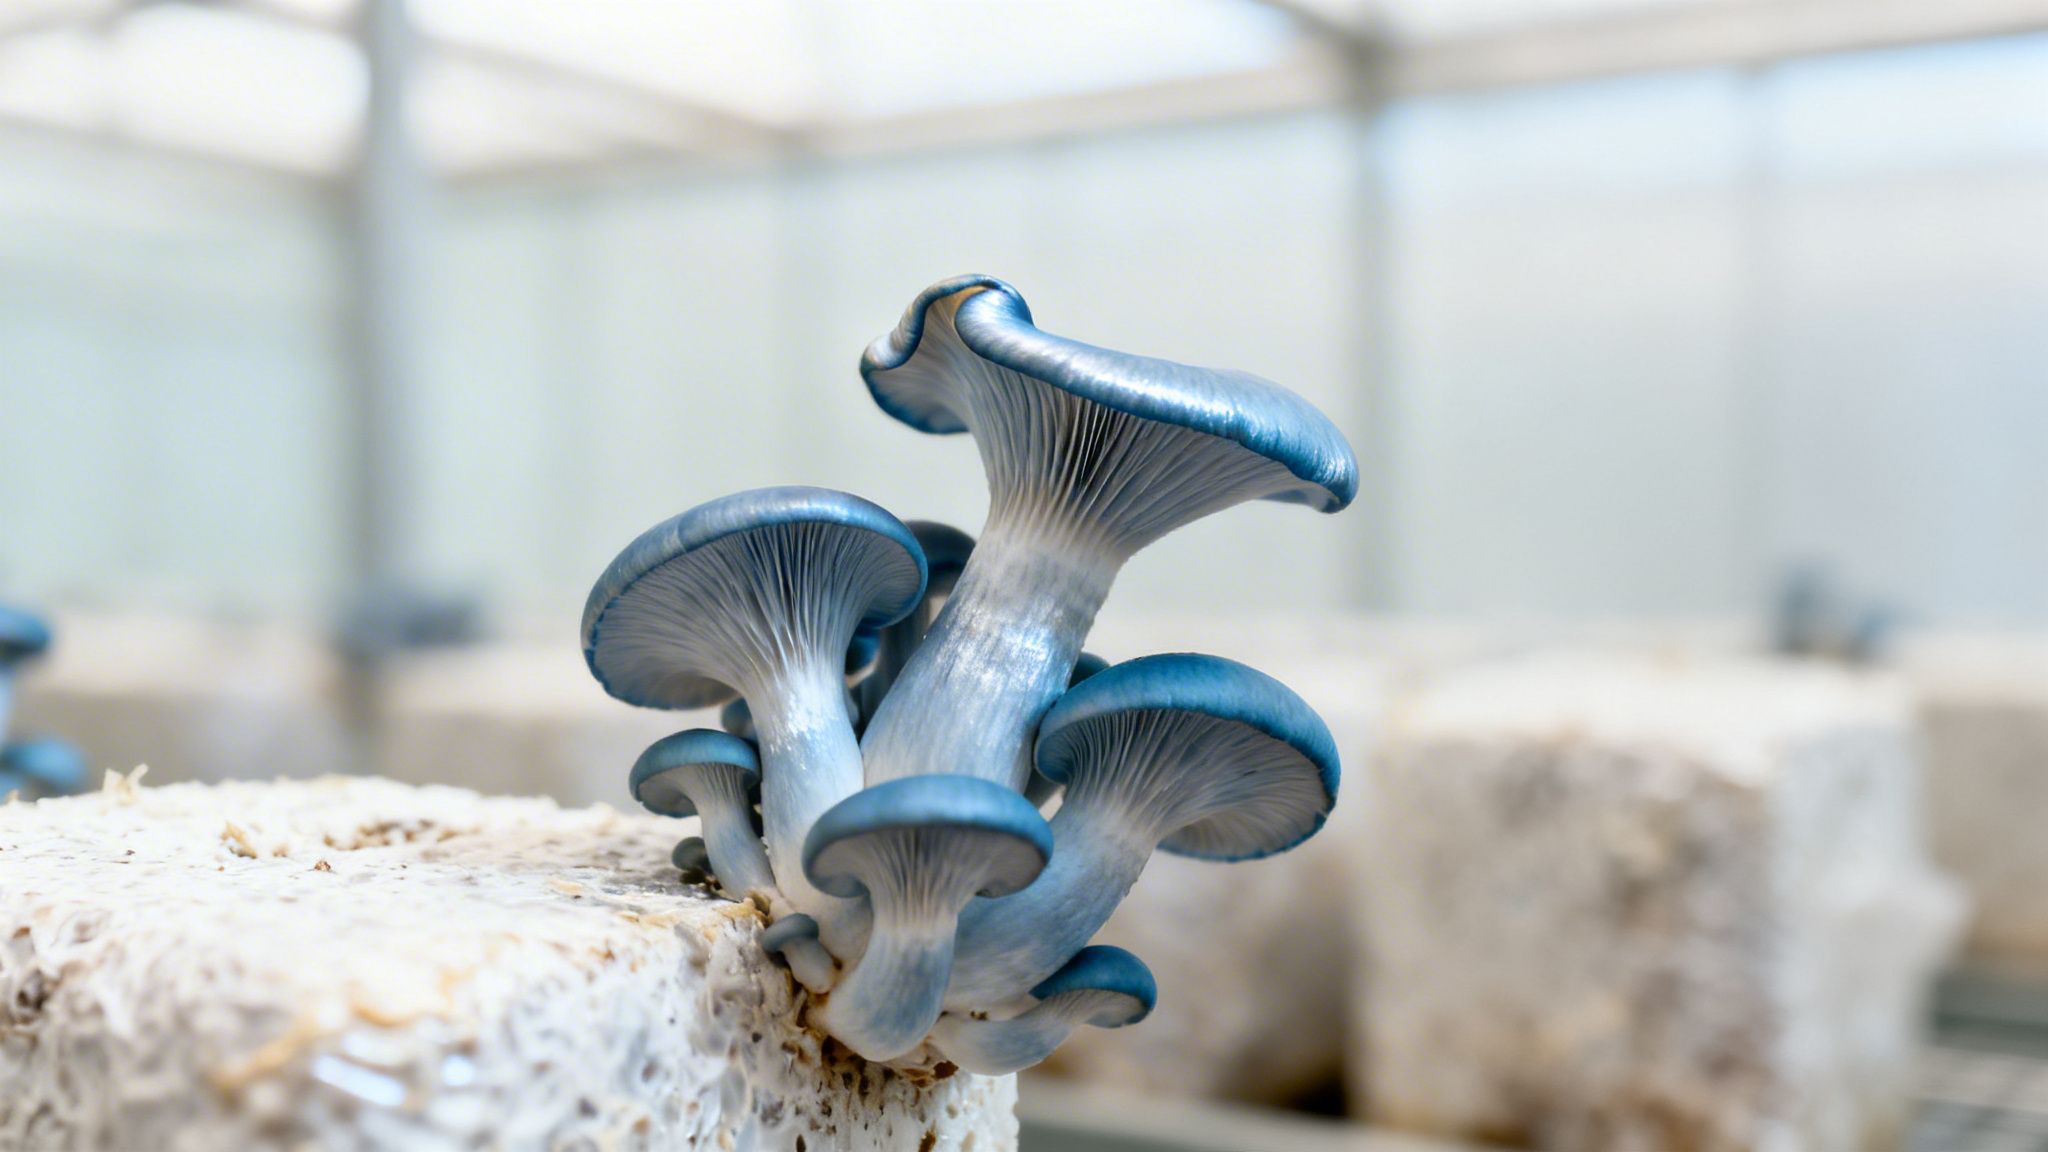
When blue oysters first pin, they look like tiny, dark blue buttons with their edges rolled in tight. Over just a few days, those caps will expand fast. Your job is to harvest them just as they’re shifting from that button shape to a flatter, more shelf-like form.
This is the most important signal you’ll get. A perfect cluster will have caps that are nearly flat but still have a slight downward curve right at the edge. That's the sweet spot—when they've hit their maximum size without losing that amazing, tender texture.
The Critical Cap Curl
That little curl on the edge of the cap is your final confirmation. On young mushrooms, the edge is curled way under to protect the gills. As the mushroom gets ready for harvest, that edge unrolls until it's almost straight, but still pointing down just a bit. This is your cue to grab your knife.
Think of it like a flower just before it opens all the way. This is when the mushroom is at its absolute best. Once those edges start curling up, you’ve missed the ideal window. The mushroom has officially switched gears to its final mission: releasing spores.
The moment a blue oyster mushroom's cap edge begins to turn upward, it has passed its peak. The texture will start to become tougher and more leathery as the mushroom dedicates its energy to spore production rather than growth.
An upward curl means you're a little late to the party. The flavor will still be there, but you'll lose the velvety texture that makes blue oysters so incredible.
Gill Exposure and Spore Release
The gills give you another clue that works right alongside the cap shape. When the caps are young and rounded, you can barely see the gills underneath. But as the cap flattens out, those delicate, blade-like gills become fully visible and perfectly defined.
Seeing the gills fully exposed is another sign that they’re ready. It’s the mushroom’s way of preparing to drop spores, which look like a fine, white dust on whatever is below the cluster. If you see a heavy layer of white powder, it's a definite sign you’ve waited a bit too long. They're still edible, but they won't be at their prime, and you'll have a bit of a mess to clean up.
Following the Color Shift
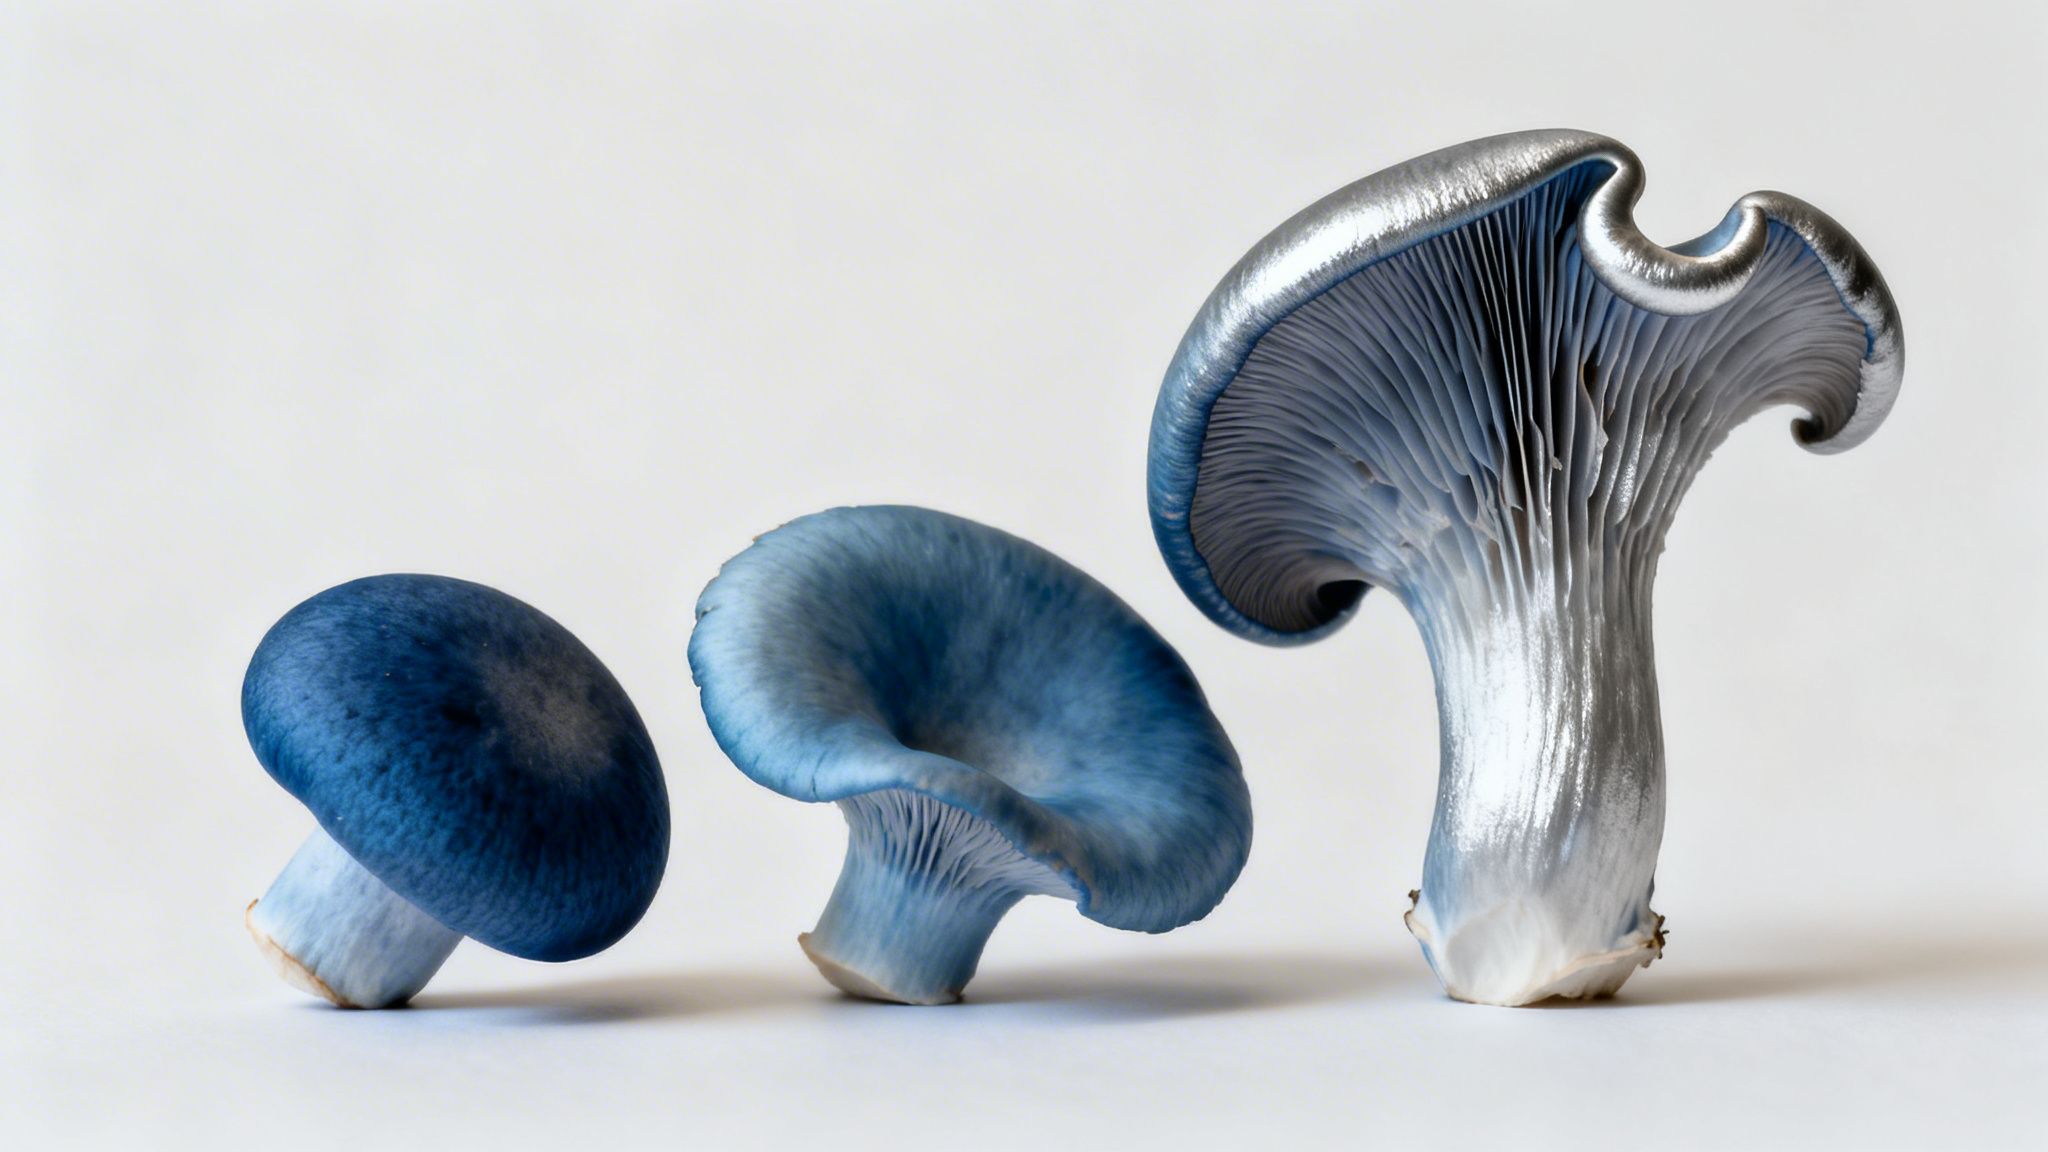
Last but not least, watch the color. Young blue oyster mushrooms have that stunning, deep blue color, but it doesn't stick around. As the caps get bigger and mature, that deep blue starts to fade.
Here's what to look for:
- Young Stage: A rich, deep blue or dark gray-blue.
- Ready Stage: The color softens to a lighter blue-gray or even a silvery hue.
- Past Prime Stage: The color might fade even more to a pale tan or cream, especially if the cap edges look dry and wavy.
This color change from dark blue to a lighter, silvery-gray happens at the same time the cap flattens. When you see that softer color, a flat cap, and a downward-pointing edge, you’re looking at a perfect cluster that’s ready for harvest.
Understanding the Rapid Growth Cycle and Harvest Window
If there’s one thing to know about blue oyster mushrooms, it’s that they grow fast. One day you’ll see tiny little specks, and what feels like the next morning, you have a massive cluster ready for the frying pan. This speed is exactly why knowing their growth timeline is critical.
Once you spot the very first signs of pinning—those tiny, dark blue nubs emerging from the block—the countdown begins. You’re typically looking at just 4 to 7 days from that moment until harvest time. They can easily double in size every 24 hours, so checking on them daily isn’t just a good idea; it’s essential if you want to catch them at their peak.
From Pinning to Prime Harvest
Watching a pinset develop into a full-blown cluster is one of the most rewarding parts of growing mushrooms. At first, you’ll see a dense group of small, round, almost black dots. Within a day or two, these pins will grow into distinct, deep-blue buttons with caps that are still curled up tightly.
This is the expansion phase, and it’s where the real magic happens. You’ll watch the caps unfurl and their color lighten from deep indigo to a silvery-blue or grey as they mature. Keep a very close eye on them now—the window between "almost perfect" and "a little too late" can be less than a single day.
The Cycle of Flushes
Your grow block isn’t a one-and-done deal. It’s designed to produce multiple harvests, which we call flushes. After you pick your first batch, the mycelium takes a short break to recover before pushing out a new wave of mushrooms.
- First Flush: This is almost always your biggest and most impressive harvest. The clusters are usually dense, and the growth is incredibly fast.
- Second Flush: You can expect a second flush to appear about one to two weeks after the first. It will likely be smaller and the clusters might not be as tightly packed, but the mushrooms are just as delicious.
- Subsequent Flushes: You might even get a third or fourth flush. Just know that each one will be smaller than the last and may take a bit longer to show up as the mycelium uses up its energy.
To get the most out of your block, make sure you harvest the entire cluster cleanly and keep the humidity and temperature in the right range. If you’re looking to get more technical and start your own mushroom projects from scratch, our guide to mushroom liquid culture is a great place to learn more.
Harvesting Tip: Don't be surprised if your second or third flush looks a little different. It's completely normal for the clusters to be smaller or more spread out. The important thing is to use the same harvesting signs for every flush: watch the cap shape, the edge curl, and the gills.
By knowing what to expect from these timelines and understanding how flushes work, you can stay one step ahead. It ensures you’re always ready to harvest your blue oyster mushrooms when they’re at their absolute best, maximizing both the flavor and the total yield you get from your block.
How to Properly Harvest and Handle Your Mushrooms
Once you’ve identified that perfect, ready-to-go cluster, it's time to harvest. How you harvest your blue oyster mushrooms is just as critical as when you do it. A clean, precise technique ensures you get a beautiful final product and, just as importantly, protects the mycelium block so it can give you a healthy second or even third flush.
There are two fantastic ways to get the job done, and your choice really just comes down to personal preference. The main goal is always the same: remove the entire cluster at once, leaving as little of the stem behind on the block as you can.
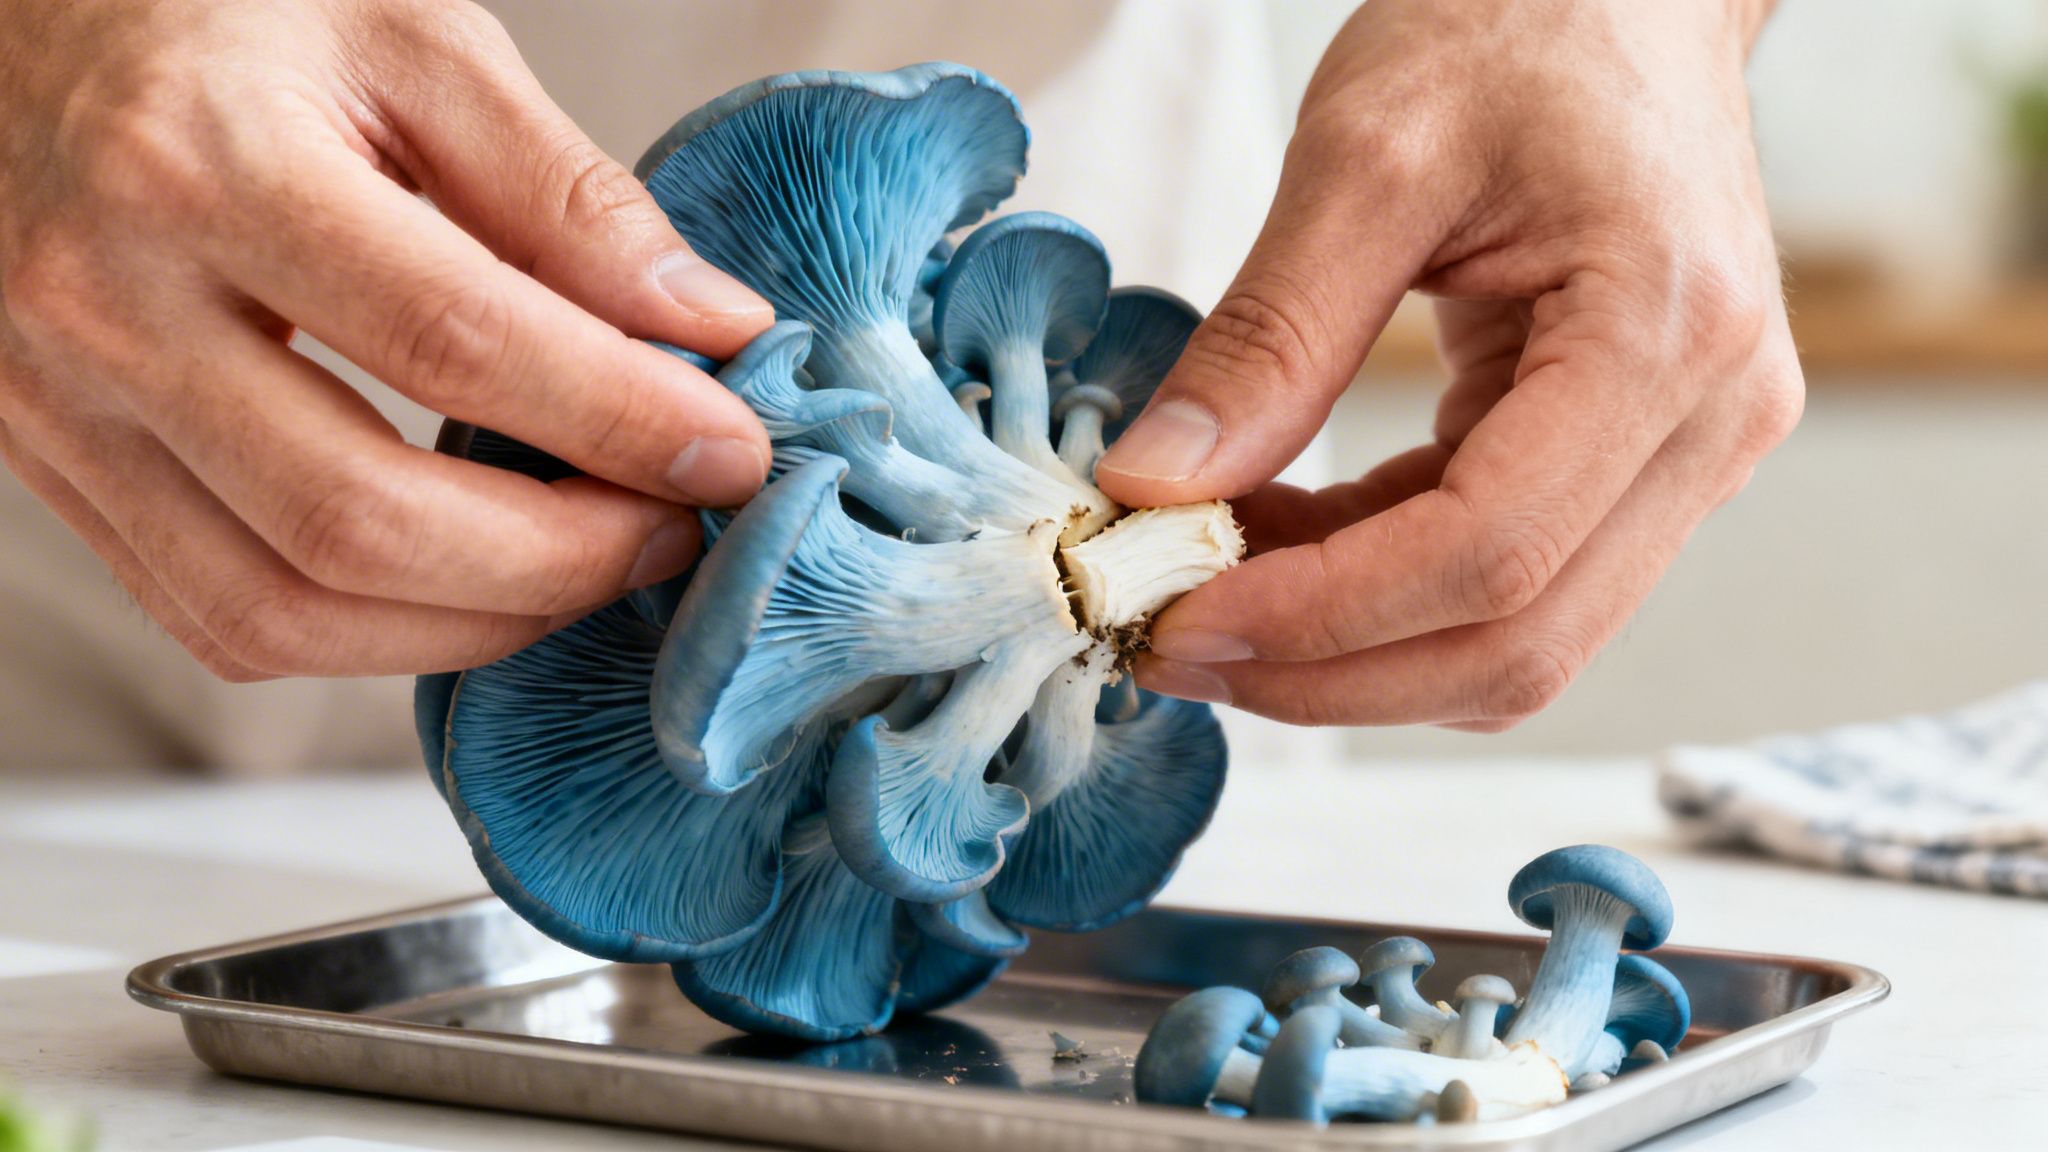
The most popular method, and arguably the simplest, is the classic twist-and-pull. It requires zero tools and, when you get the hang of it, creates a clean break that encourages new pins to form for the next round. Just grip the whole cluster firmly at its base—right where it meets the grow block. With a gentle but firm motion, twist the cluster and pull it away. You'll feel a satisfying little snap as it detaches cleanly from the substrate.
Choosing Your Harvest Method
If you're someone who prefers a more precise touch, a sharp knife is your best friend. Using a blade can feel a bit less forceful and is perfect for getting an exceptionally clean cut right against the block. If you go this route, grab a thin, sharp blade. A paring knife, a scalpel, or a dedicated mushroom knife will all work beautifully.
Simply slide the blade as close to the block's surface as possible and slice through the base of the cluster in one smooth motion. The key here is to avoid leaving any mushroom stem on the block. Any leftover mushroom tissue can start to rot and become a breeding ground for contaminants like green mold, which could ruin your chances for future harvests. While this guide is for culinary blue oyster mushrooms, it's important to remember that some mushrooms have legal restrictions. For example, psilocybin mushrooms are controlled substances in most jurisdictions, including Michigan. You can find more information about the best harvesting practices for culinary oyster mushrooms to ensure you get a great harvest every time.
Pro Tip: No matter which method you use, always harvest the entire cluster at once. Even if a few of the mushrooms look a bit small, take them all. Leaving part of a cluster behind can signal to the mycelium that the flush is over, and it will often stop the remaining mushrooms from growing any larger.
Post-Harvest Handling and Storage
You’ve got your gorgeous cluster of blue oysters in hand—now what? The way you handle them right after picking is what preserves their delicate flavor and perfect texture. The number one rule for cleaning oyster mushrooms is to use as little water as possible. They act like tiny sponges and will soak up water, making them soggy when you cook them.
Here’s the best way to clean and store your fresh harvest:
- Cleaning: Grab a soft brush or a dry paper towel and gently wipe away any bits of substrate or debris. If they're especially dirty, you can give them a very quick rinse under cold water, but you must immediately and thoroughly pat them dry. Try to avoid water if you can.
- Fridge Storage: For short-term storage, place your clean, dry mushrooms in a paper bag or a container that allows for some air circulation. Stay away from sealed plastic bags; they trap moisture and will turn your beautiful mushrooms slimy in a day or two. Stored correctly in the fridge, they’ll stay fresh for up to 5-7 days.
- Long-Term Storage: If you end up with a bigger harvest than you can eat fresh, dehydration is the way to go for long-term preservation. Slice the mushrooms into even pieces and use a food dehydrator until they're completely brittle. Once dried, store them in an airtight jar, and they'll last for months, ready to be rehydrated for delicious soups and sauces.
By following these simple harvesting and handling steps, you can ensure every single flush is as delicious as possible. If you're interested in broadening your mushroom-growing skills, you can explore more advanced topics through our comprehensive guides on mushroom cultivation.
Common Harvesting Mistakes and How to Avoid Them
Even with the best instructions, it's easy to make a few classic mistakes on your first few harvests. I've seen it plenty of times. But steering clear of these common pitfalls is exactly how you get the best flavor, a fantastic texture, and multiple harvests from a single block.
The single most common mistake? Just waiting too long. It’s a natural instinct to think bigger is better, but with oyster mushrooms, that’s almost never the case. Once those beautiful caps start to curl upwards, you’ve already missed the perfect moment.
When you wait too long, two things happen. First, the mushrooms dump a massive amount of spores—it looks like a fine white dust that gets everywhere. It’s not harmful, but it’s a mess to clean up. More importantly, the mushroom’s texture turns tough and almost woody as it shifts all its energy into reproduction.
Picking and Damaging Your Block
Another slip-up I see is picking individual mushrooms from a cluster instead of harvesting the whole group. Oyster mushrooms grow as a collective. When you start pulling one or two off, you can signal the mycelium to abort the mission, and the rest of the mushrooms will just stop growing.
To get around this, commit to harvesting the entire cluster as soon as the biggest caps are ready. This one move not only gives you the best possible yield from that flush, but it also tells the mycelium it’s time to start gearing up for the next round.
A bad harvesting technique can also do some real damage. If you cut the stems too high, you’re leaving behind tissue that will inevitably rot and invite contamination. On the other hand, if you just rip the cluster off, you can tear out a chunk of the mycelium block itself, which hurts its ability to produce more mushrooms. A clean twist-and-pull motion or a careful, precise cut right at the base is always the way to go.
Key Takeaway: The goal is to cleanly remove the whole cluster. This signals a successful fruiting cycle to the mycelium, which is what encourages a strong second flush and helps you avoid contamination that could end your grow early.
For anyone interested in identifying a wider range of fungi, especially species you might find in the Midwest, we put together a guide on the mushrooms of Illinois that you might find helpful.
Understanding Your Grow
Finally, it’s really important to be 100% sure about the specific mushrooms you're growing. This guide is all about edible, culinary blue oyster mushrooms. It’s crucial to distinguish these from other types of fungi to ensure you’re following the right advice for the right species. To learn more about the distinct characteristics of culinary blue oyster mushrooms, you can explore additional details about their culinary uses and properties.
Common Questions About Harvesting Blue Oyster Mushrooms
Even with the best instructions, you're bound to have a few questions when you're face-to-face with your first big flush. Let's run through some of the most common things I get asked by growers, so you know exactly what to do when your mushrooms don't perfectly follow the script.
Think of this as the troubleshooting section—quick answers to help you build confidence and get the best possible harvest.
Can I Still Eat Mushrooms After They Drop Spores?
You absolutely can. Blue oyster mushrooms are still perfectly edible after they’ve released their spores. The biggest issue isn't safety or even flavor—it's all about texture and a bit of a mess.
A mushroom that has already dropped its spores is past its prime. You'll find its texture is much tougher, almost leathery, compared to one picked at the perfect time. That spore drop also leaves a fine white powder on everything below the cluster, which is just a pain to clean. While you can cook them up, you'll miss out on that amazing velvety texture you were aiming for.
Why Are My Mushroom Caps Cracking?
Cracked caps are a dead giveaway for one specific problem: low humidity. As your mushrooms develop, they need a consistently moist environment to stay flexible and grow properly. If the air gets too dry, their caps can't stretch as they expand, which causes them to crack, sometimes well before they're even close to full size.
The fix is simple: get more humidity around your grow block. Try misting the area around your mushrooms more often—just be sure not to spray the caps directly. Using a humidity tent or moving your kit to a naturally humid spot, like a bathroom, can also do the trick and prevent cracking in your next flush.
When you're trying to decide when to harvest blue oyster mushrooms and see cracking, it's almost always better to just pick them, even if they seem a little small. Those cracks won't heal, and they're a clear sign of stress. Harvest them before the quality degrades any more.
Should I Harvest Early or Late?
If you're ever on the fence about timing, my advice is always the same: harvest a little early rather than a little late. This is a choice that puts quality squarely over quantity.
Here’s how to think about it:
- Harvesting Early: You might give up a tiny bit of potential size and weight. What you get in return, though, are mushrooms with a far superior, tender texture and a more delicate flavor.
- Harvesting Late: Sure, you get a slightly bigger mushroom, but you’re trading that for a tough, chewy texture and the inevitable mess from the spore drop. The quality plummets fast once those cap edges uncurl.
A slightly smaller mushroom with a perfect texture will always beat a bigger, leathery one in the kitchen. Trust your eyes, aim for that sweet spot just before the caps go flat, and you’ll be golden.
Ready to explore a different kind of mushroom experience? Metro Mush offers a curated selection of premium psilocybin products for adults in Southeast Michigan. Browse our menu and find your perfect match. Find out more at https://metromush.com.